eNotices Initial Setup
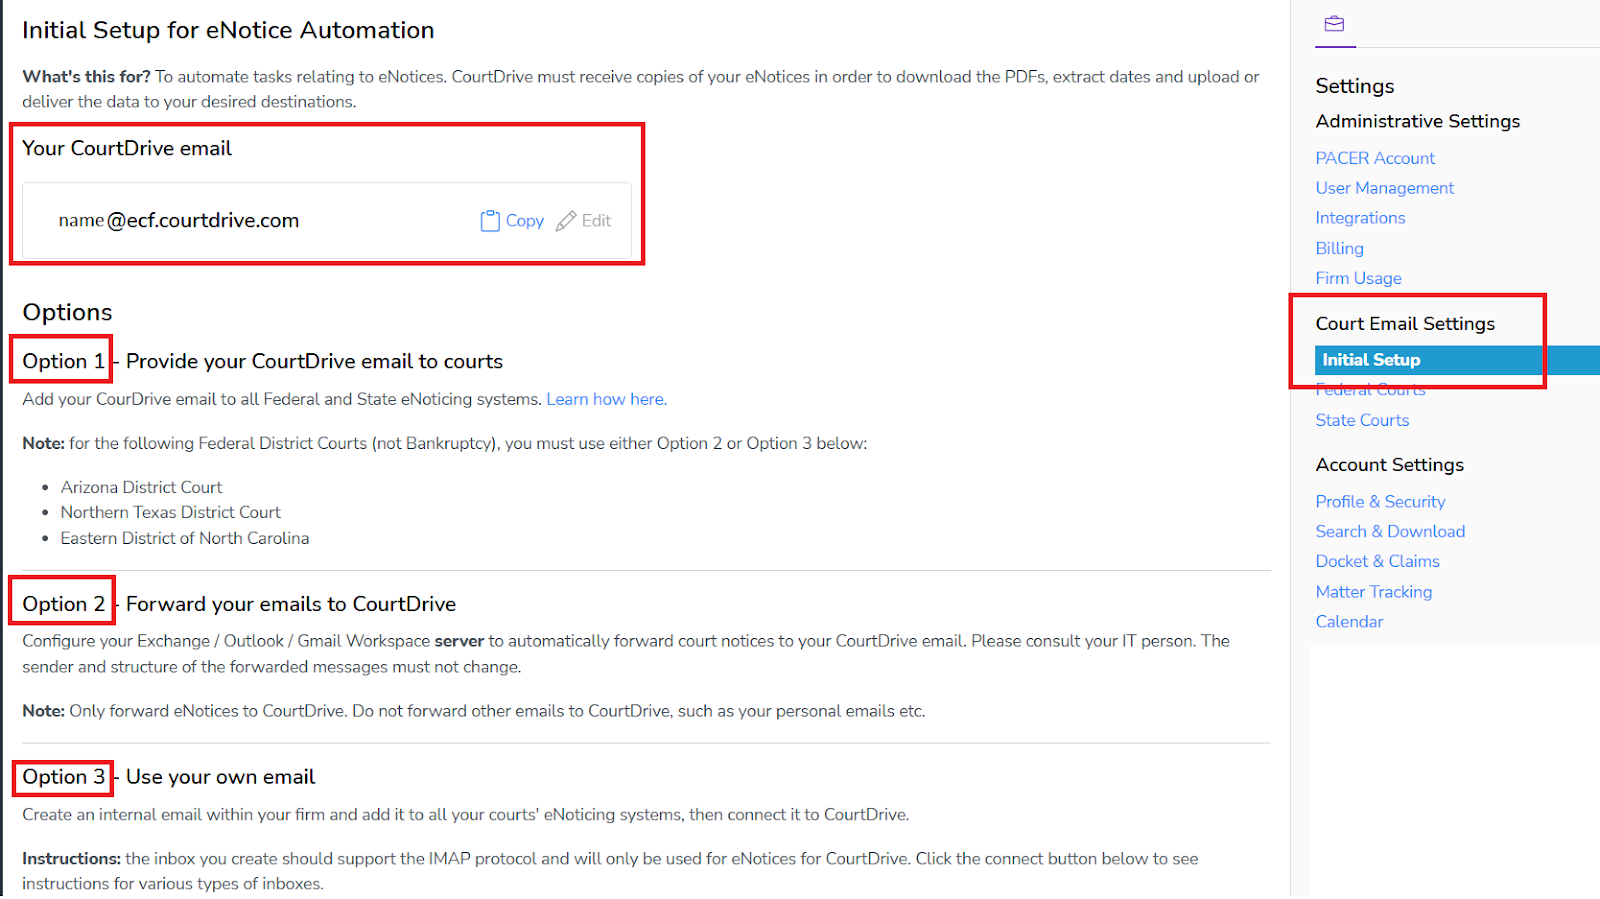
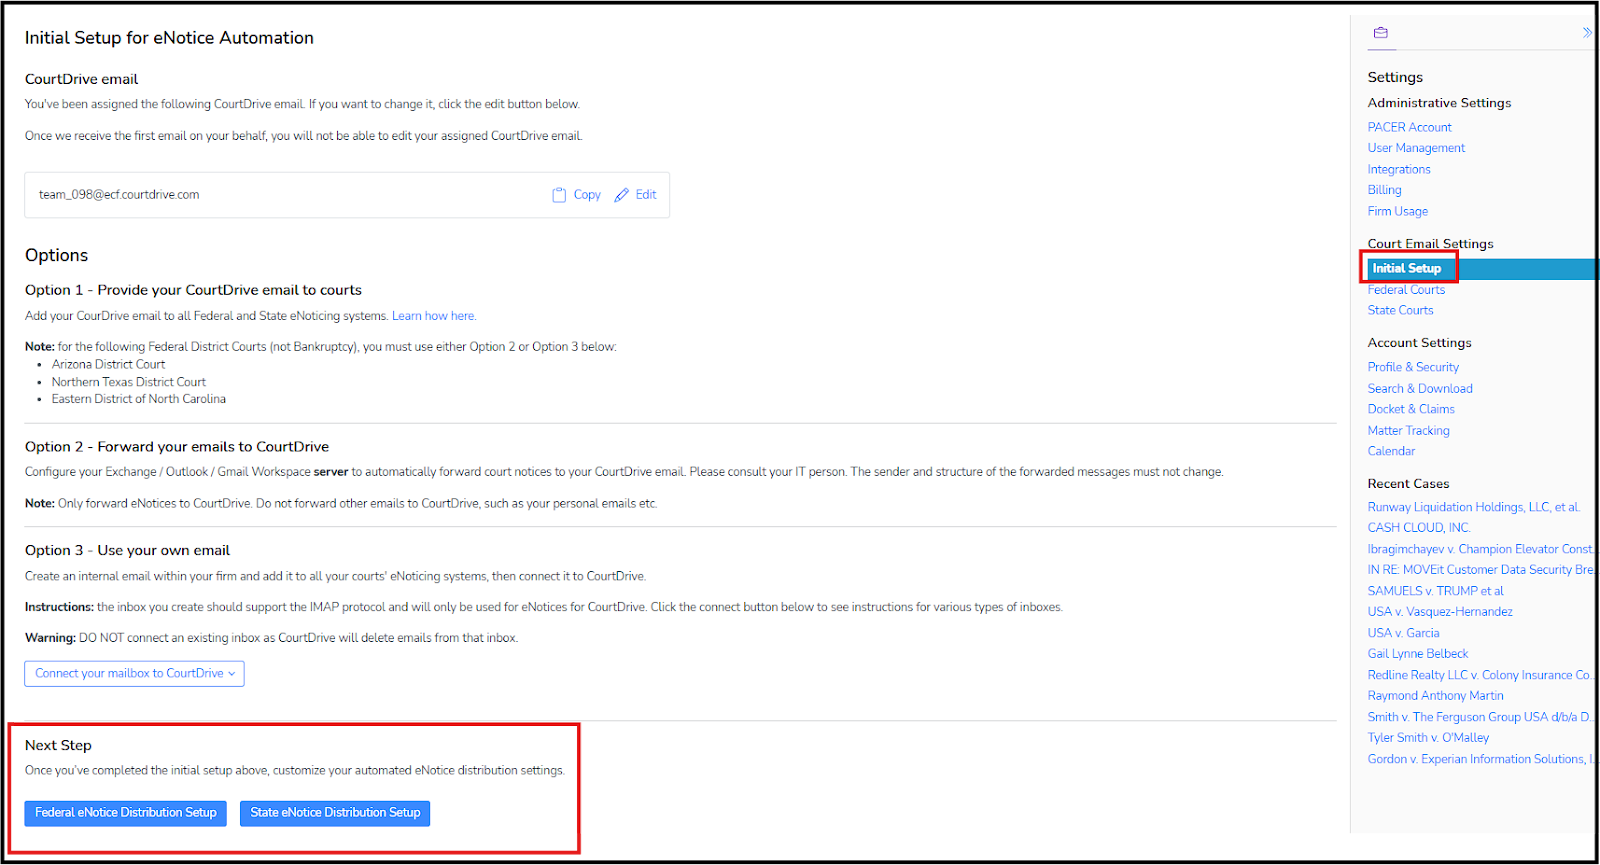
Directing copies of your firm’s eNotices to CourtDrive is a simple 2-step process. From your settings here:
1 - select a CourtDrive email
2 - use one or more of the three options listed to send copies of your eNotices to CourtDrive.
Tips for selecting a CourtDrive email:
- Not everyone in the firm needs a CourtDrive email. You can assign a CourtDrive email to each attorney, or to their staff instead, or one for each department or one for the whole firm. The key is to make sure CourtDrive receives at least one copy.
- You can edit your CourtDrive email until it receives an email. You can select any prefix you want, whether your name or an anonymous alias. This is your preference and has no bearing on any functionality.
- Your firm's CourtDrive Administrator may have assigned you a CourtDrive email before you get to the above screen. You may be able to edit your CourtDrive email, but it’s a good idea to check with them before doing so.
Tips for selecting different options to feed your eNotices into CourtDrive:
From the three options provided in your Setting, please note:
- All options available can be used either separatly or in conjunction with each other. Depending on your practice, optimal choices are explained below.
- For Federal Cases, most firms use Option 1, except for several jurisdictions noted in your settings. You must use Option 2 for those jurisdictions, which include:
- Arizona District Court
- Northern Texas District Court
- Eastern District of North Carolina
- For State Cases, most firms use Option 2 as they find this to be the easier option. If your state does not have an easy way to add an additional notice recipient for all your cases, this option will be more expedient. Since this Option requires setting up a mail flow rule, please have your IT department follow the relevant instructions below (depending on if your firm uses Outlook Exchange or Google Workspace for email routing).
- The last option (option 3) in your settings allows you to connect your own internal inbox to CourtDrive. However, this method is more complicated and not commonly used. It requires your IT personnel to create a dedicated internal inbox that only CourtDrive can access. As there are different services that can be used for managing inboxes, further instructions for the main email service providers are provided on the initial setup page in your Settings.
Federal Courts Setup
For federal courts, most firms use Option 1 described above whereby a CourtDrive email is added to each attorney filer account as an additional notice recipient. You can also use any other option, either separatly or in conjunction with each other.
Using Option 1 to direct copies of your federal court eNotices into CourtDrive
The following instructions cover the three main types of federal courts (Bankruptcy, District, Appeals). Scroll down to read about the court of your choice.
Bankruptcy Court Setup
Adding your CourtDrive email to your Bankruptcy Court CM/ECF Filer Account
Once you've obtained your CourtDrive email, you must add it to your CM/ECF filer account as a secondary email to which NEF notices will be sent.
The following are general instructions applicable to most courts. The menus may differ slightly across jurisdictions. If you need help, please contact support@CourtDrive.com.
NOTE: For the following courts, you need to email the CM/ECF helpdesk and request them to add the CourtDrive email as an additional notice recipient.
- Eastern District of Michigan - cmecfhelpdesk@mieb.uscourts.gov
- Northern District of California - helpdesk@canb.uscourts.gov
- Southern District of Illinois - ilsbwebmaster@ilsb.uscourts.gov
General Instructions:
Log in to your CM/ECF account and follow these steps:
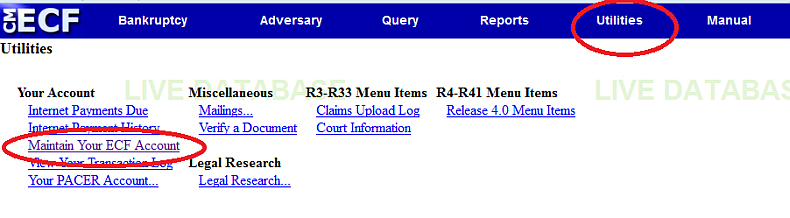
1. Click on "Utilities" from the blue main menu bar and then click "Maintain Your ECF Account" as shown below:
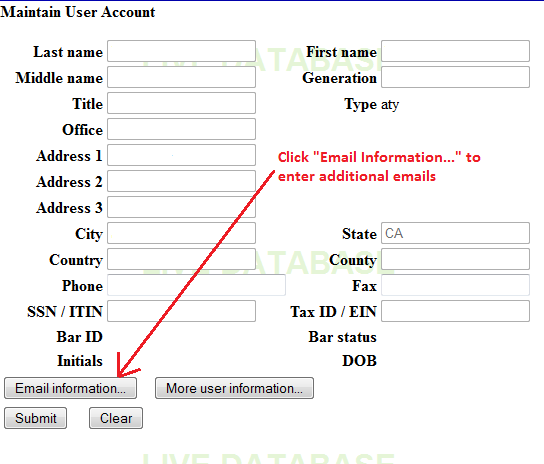
2. Click the Email information button towards the bottom
3. Add secondary email address and reenter to verify (shown below)
(NOTE: You can add more than one email into this box. Hit enter to go to the next line and enter it there as shown below):
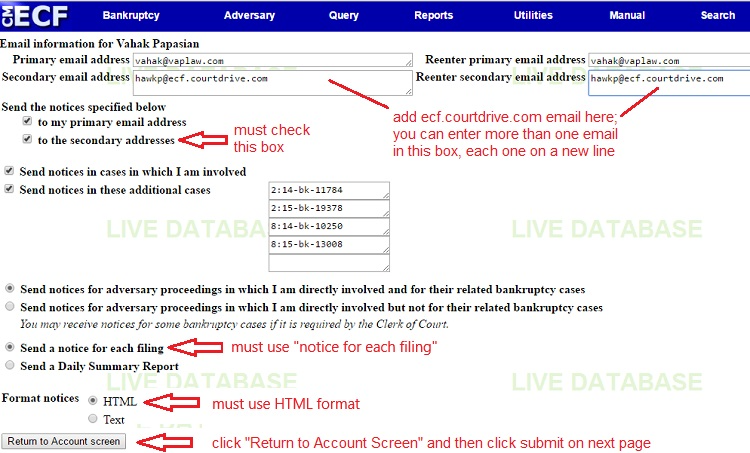
4. Check the box that says "Send the notices specified below to the secondary addresses" (shown above)
5. Select the option that says "Send a notice for each filing" (shown above).
6. Click the Return to Account screen button (shown above)
(NOTE: this will not save your information yet - you need to click submit on next step)
7. Click Submit
8. Click submit again on the next page if necessary (not required in some jurisdictions).
Again, please note that some jurisdictions may be different from others. If you need assistance adding your CourtDrive email to your ECF account with the court, please email support@courtdrive.com.
District Court Setup
Adding your CourtDrive email to your District Court CM/ECF Filer Account
Once you've obtained your CourtDrive email, you must add it to your CM/ECF filer account as a secondary email to which NEF notices will be sent.
Log in to your CM/ECF account and follow these steps:
1. Click utilities
2. Click Maintain your e-mail address

3. Click add new e-mail address

4. On the right side of the screen, enter your ecf.courtdrive.com email
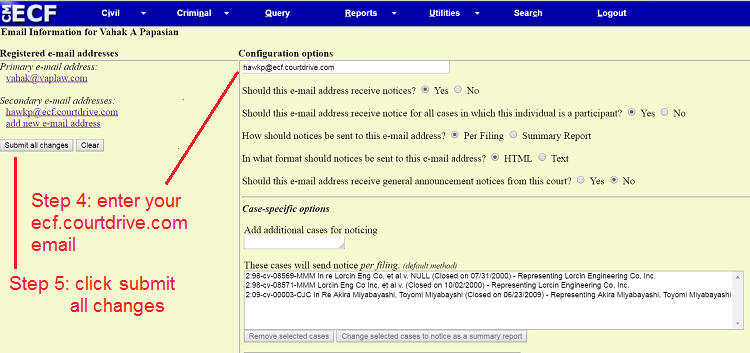
5. Click submit all changes
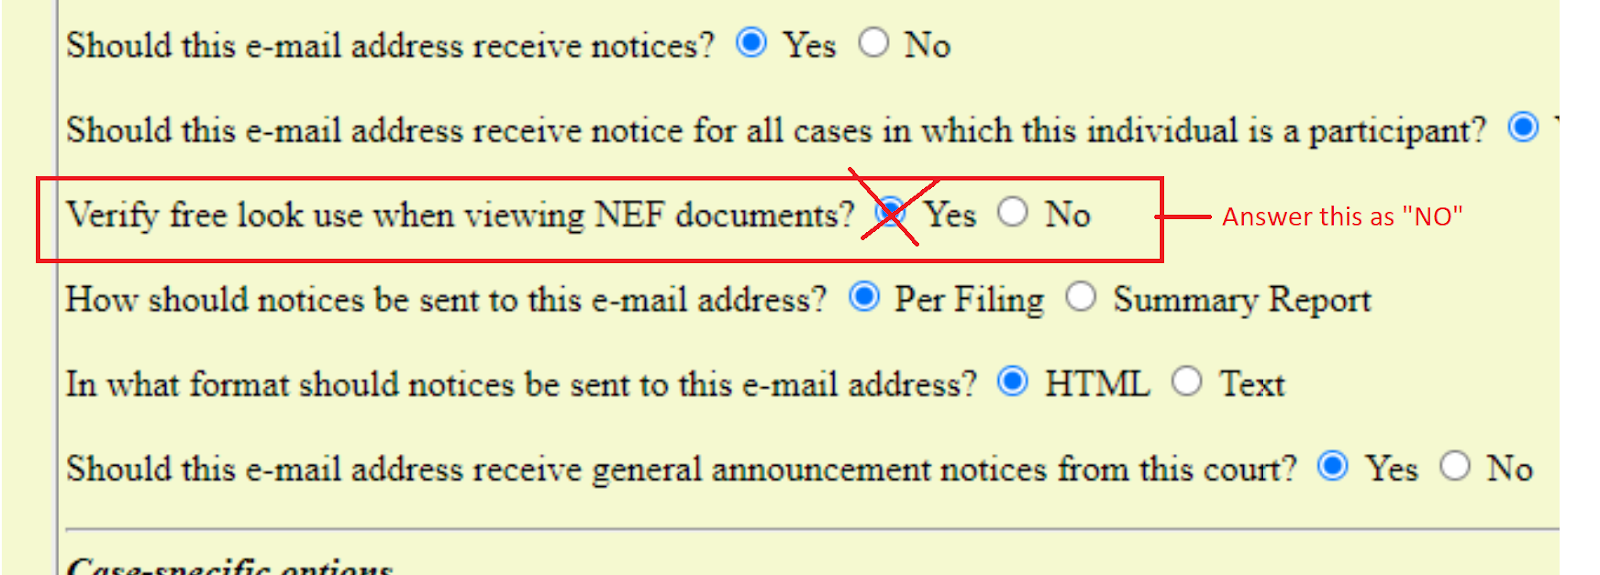
PLEASE NOTE: if your jurisdiction has the following choices, make sure to select "No" for the choice shown below:
6. Make sure you get "update was successful" confirmation

Please note that some jurisdictions may be different from others. If you need assistance adding your CourtDrive email to your ECF account with the court, please email support@courtdrive.com.
Appeals Court Setup
Adding your CourtDrive email to your Appeals Court CM/ECF Filer Account
For Legacy appellate courts, use the following instructions to add our secondary email:
1. Log in to Manage My Appellate Filer Account at pacer.gov with the
appellate ECF (e-filing) username and password.
2. Click Personal Info/Address/ECF Filing Status Updates. To update a
primary email, select Update Personal Info. For an additional email,
select Update Noticing Preferences.
3. Log in to the court’s ECF website with the ECF (filing) ID and
password.
4. Click Utilities and Notice for Cases of Interest to add cases for
noticing purposes
For NextGen appellate courts, use the following instructions to add our secondary email:
Log in at pacer.psc.uscourts.gov/pscof/manage/maint.jsf with the
PACER username and password.
2. Click the Maintenance tab.
3. Click Update E-Filer Email Noticing and Frequency. Here, you can
update, add, or remove email addresses
PLEASE NOTE: if your jurisdiction has the following choices, make sure to select "No" for the choice shown below:
State Courts Setup
Since most state court systems do not have an easy way to add a 'courtesy copy' email at the account level (you must add it case by case), Option 2 in your settings is usually the most expedient way for you direct copies of your eNotices into CourtDrive.
Option 2 allows you to route your eNotices to CourtDrive based on a server side mail flow or routing rule.
Warning: This is NOT mail forwarding. You cannot setup a forwarding rule from your mail client as that will not work. This must be done from your mail server. Instructions are provided below for both Outlook users and Google Workspace users, but please note an IT person is most suited for this task.
Continue reading below to configure either an Outlook Exchange Mail Flow Rule or a Google Workspace Mail Routing Rule.
eNotices Setup using Outlook
If your firm uses Outlook Exchange to manage emails, the following instructions explain how to redirect copies of your court eNotices into CourtDrive:
Step 1. Log into the Exchange Admin Center
- Go to: https://admin.exchange.microsoft.com
- Sign in with your admin credentials.
Step 2. Navigate to Mail Flow
- In the left menu, select Mail flow → then click Rules.
Step 3. Add a New Rule
- Create, name, and set rule confditions as shown in the two images below.
- Note: you can find your CourtDrive email in your settings here, and Admins can find everyone's CourtDrive email in User Management.
.png)
.png)
Step 4. Save and Enable the rule (or make sure it is enabled after saving).
eNotices Setup using Google
If your firm uses Google Workspace to manage emails, the following instructions explain how to redirect copies of your court eNotices into CourtDrive:
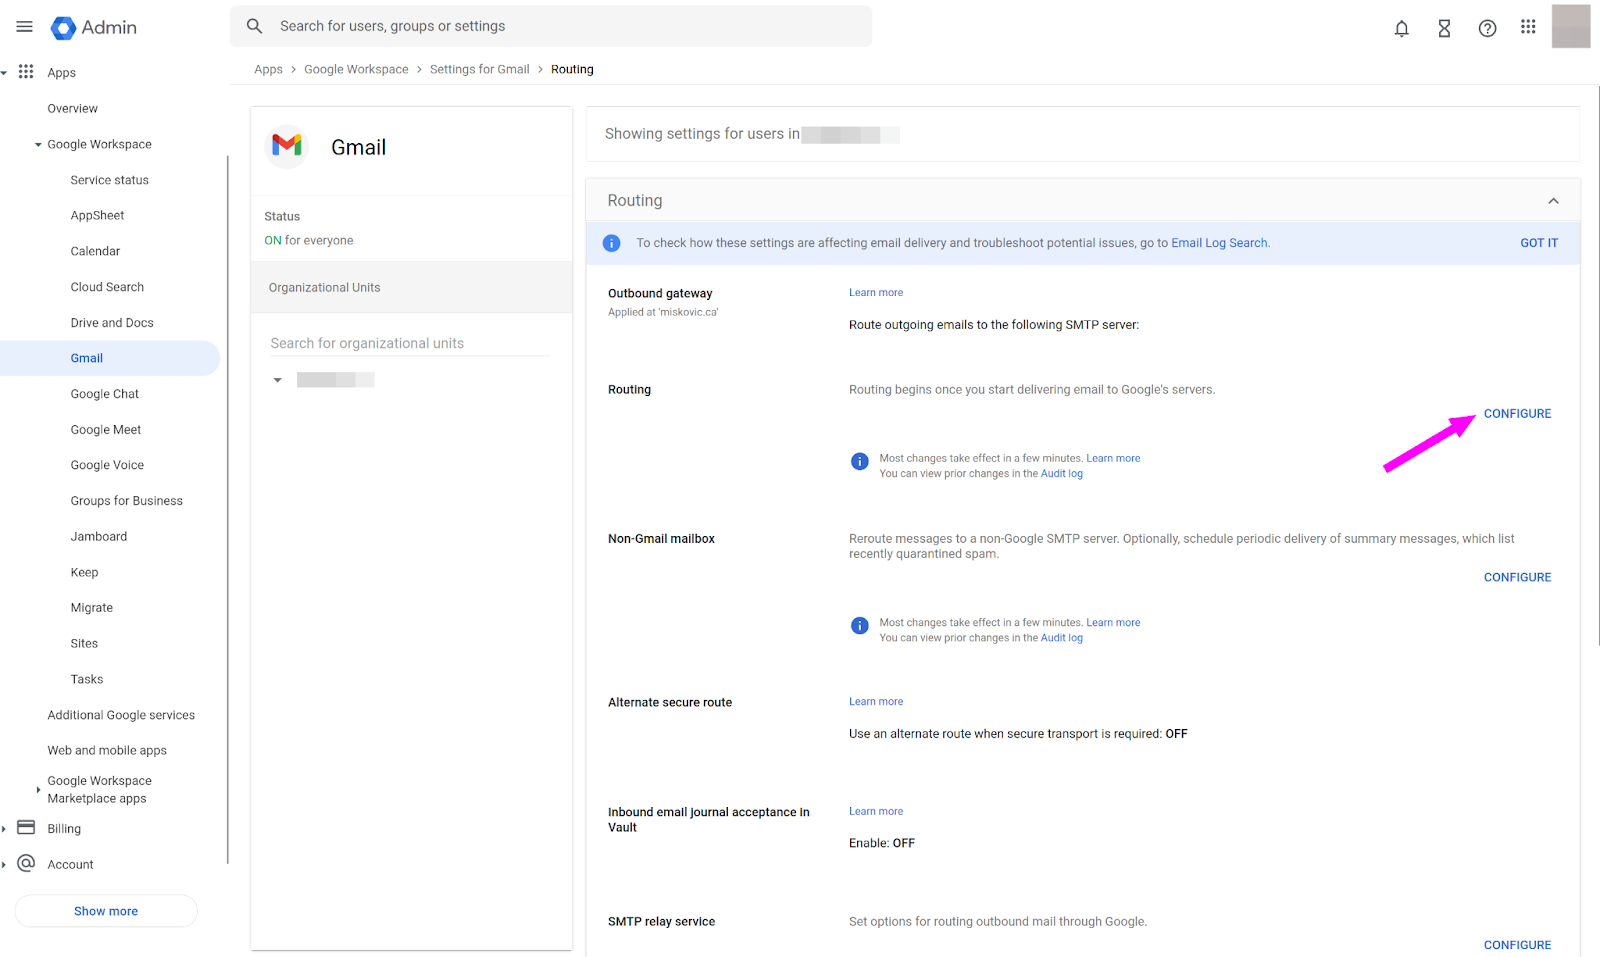
Step 1: Open Routing Settings https://admin.google.com/ac/apps/gmail/routing
You must be an administrator to make changes to this; please contact your firm’s admin and/or IT personnel to make these changes.
Step 2: From the Routing section, click “Configure” (select “Add Another Rule” instead if rules have already been configured)
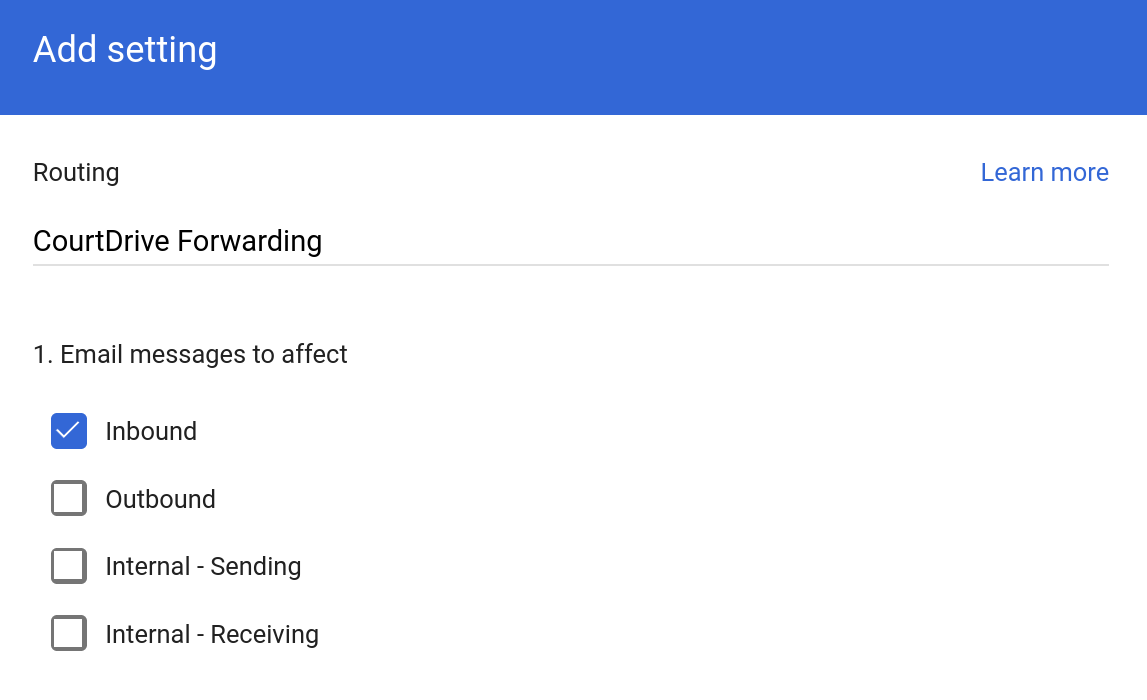
Step 3: Configure as follows
- Enter Description: “CourtDrive Forwarding”
- Under: “Email messages to affect” tick “Inbound”
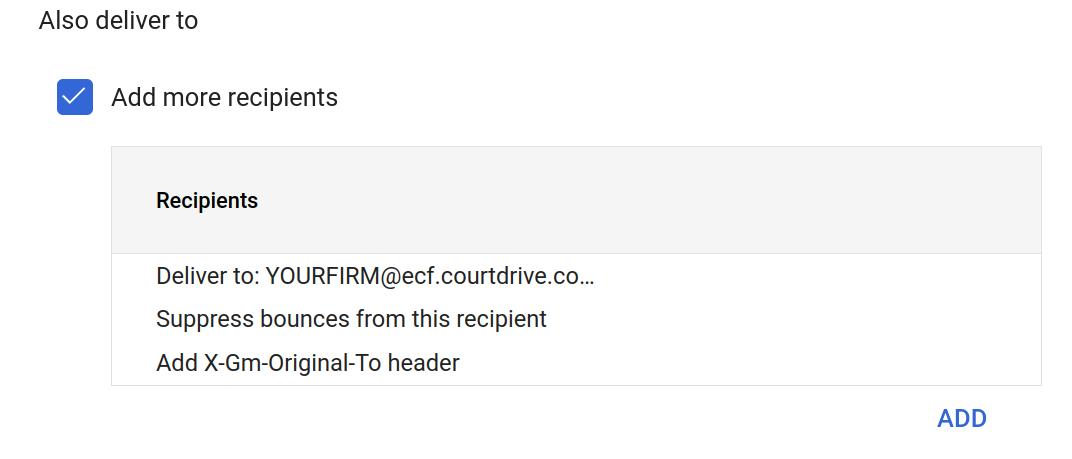
Step 4: Scroll down to the section "Also Delver To" and check the 'Add more recipients' box. Then click ADD as shown below:

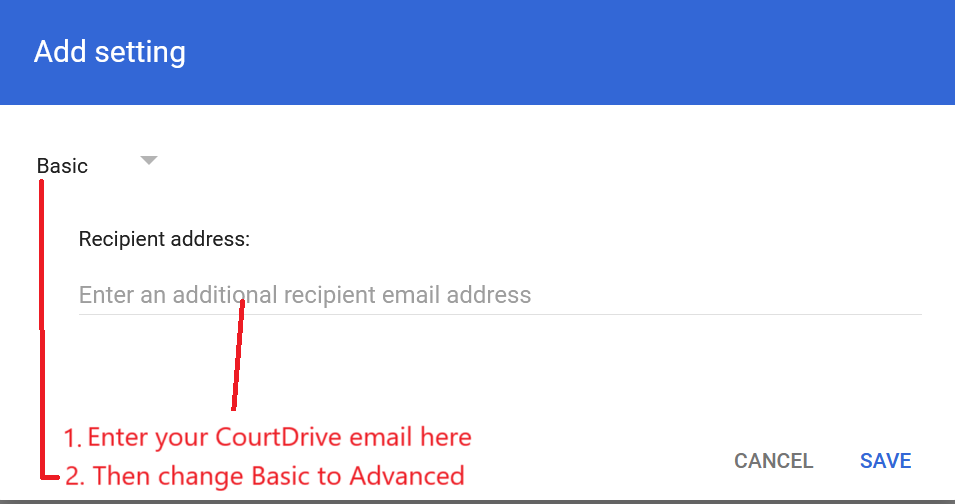
Step 5: A smaller Settings dialogue will open.
- Enter your CourtDrive email address under ‘Recipient address.’
- Click “Basic” and switch to “Advanced”
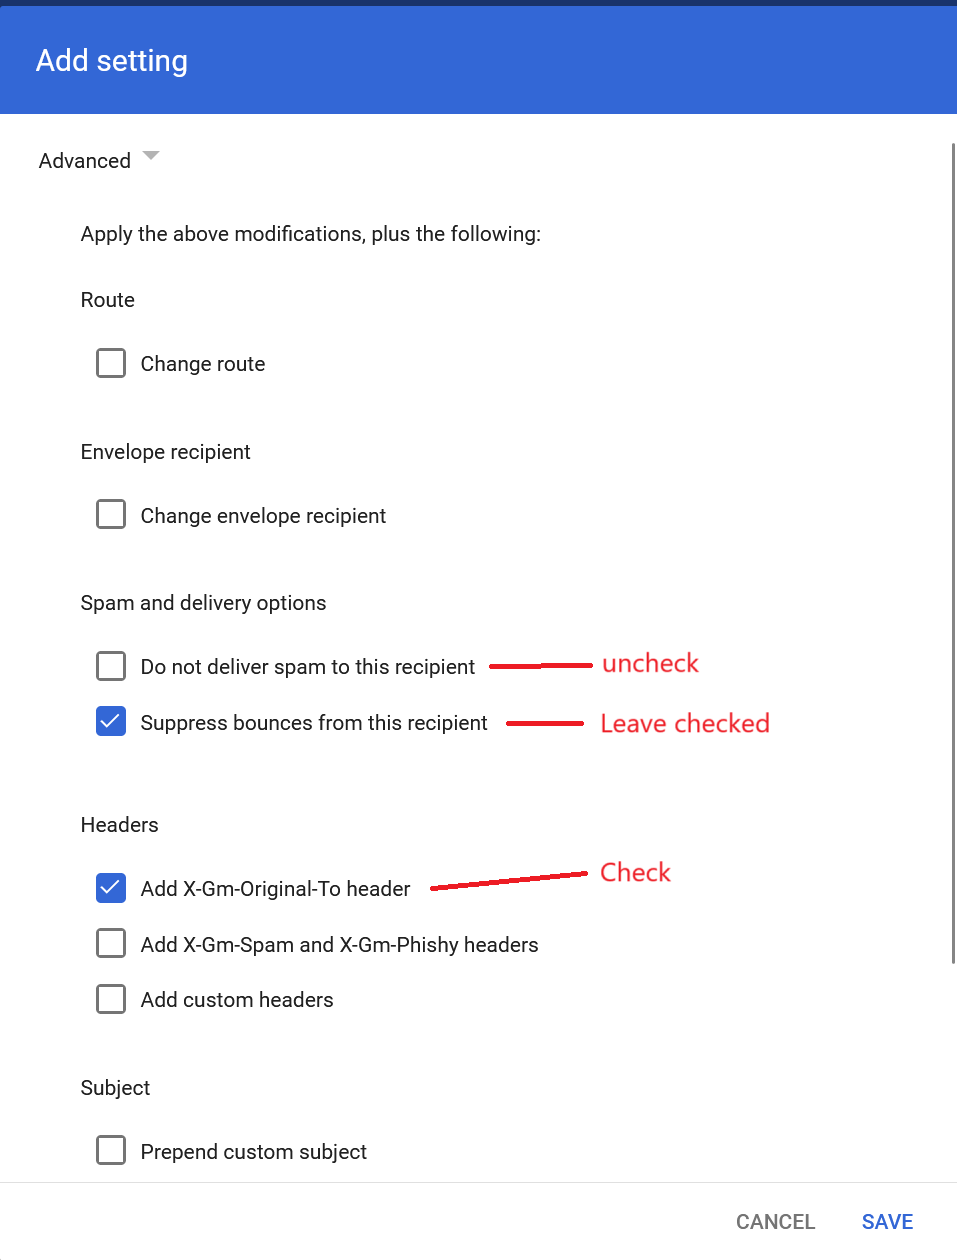
Step 6: In the Advanced settings dialogue, do the following:
- Under “Spam and delivery options” untick “Do not deliver spam to this recipient”
- Under “Headers” select “Add X-Gm-Original-To header”, then click the ‘Save’ button
- Click Save
Step 7: Verify that “Recipients” list looks something like this:
Step 8: Scroll to the bottom and click “Show options”

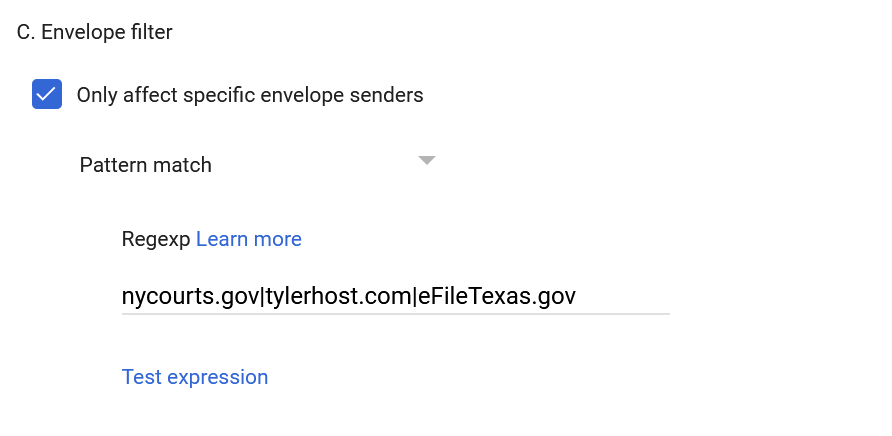
Step 9: Scroll to section "C. Envelope filter” and
- Check “Only affect specific envelope senders”
- Change the “Single Email” option to “Pattern match”

Step 10: Enter the domain addresses of court systems that you receive emails from separated by the vertical pipe | symbol. The pipe symbol is entered using the key above the Enter key on your keyboard. Also please note the following when entering multiple court domains:
- do NOT enter spaces before or after any pipe
- do NOT enter more then one pipe between each court domain
- do NOT start or end your list with a pipe
The example below shows three courts entered correctly:
Ex/ nycourts.gov|tylerhost.com|eFileTexas.gov
You can then click on "Test expression" to enter a sample email and confirm you entered your pattern correctly:

Step 11: Click ‘Save’ to finish
Preventing Email Modification when Forwarding eNotices to CourtDrive
If you are directing copies of your eNotices to CourtDrive by email routing or mail flow rules as explained above, please make sure your firm's security software does NOT modify the email from the court in any way, including what's known as "link rewriting." This will cause a disruption and CourtDrive will not be able to process your eNotices.
For example, many firms use Proofpoint as shown below (though if you use Mimecast or any other similar software, the idea is the same).
Proofpoint users will need to add court domains here as well:

This will prevent Proofpoint from modifying the emails.
eNotice Sharing per Account
eNotice Sharing allows you to receive and/or automatically distribute mobile optimized copies of your eNotices with a permanently free PDF for anyone on your distribution list.
PLEASE NOTE: Our eNotice Share feature only works with "per-event" notices. If you receive the daily summary version from the court, please switch to "per-event" notification to use this feature.
There are three ways you can share your eNotices via CourtDrive's eNotice Automation feature:
- Per Account: this method allows you to share ALL your court emails on ALL your cases internally with other members in your firm.
- Per Case: this method allows you to share court emails only for a specific case. You can share this with others inside or outside your firm.
This article shows you the "Per Account" method which is set from your account settings. Further below shows you the "Per Case" method, which is set from the Firm cases list.
To turn on and edit eNotices for your Account, navigate to your account settings. You need to have set up your account to receive eNotices as described above. Once you've done that, you can turn eNotice Distribution Set-up ON/OFF by navigating to the sections for Federal and/or State eNotices as shown below:
Thereafter, decide who in your firm should receive the notices by setting up an internal distribution list. Do NOT add external parties to your account settings here because they will receive copies of everything on ALL your cases. Later we will show you how to setup a distribution list "per case" so you can add external parties (such as clients or opposing counsel) to a specific case.
You can do this for both Federal and State eNotices; just select the correct link, and proceed as shown.
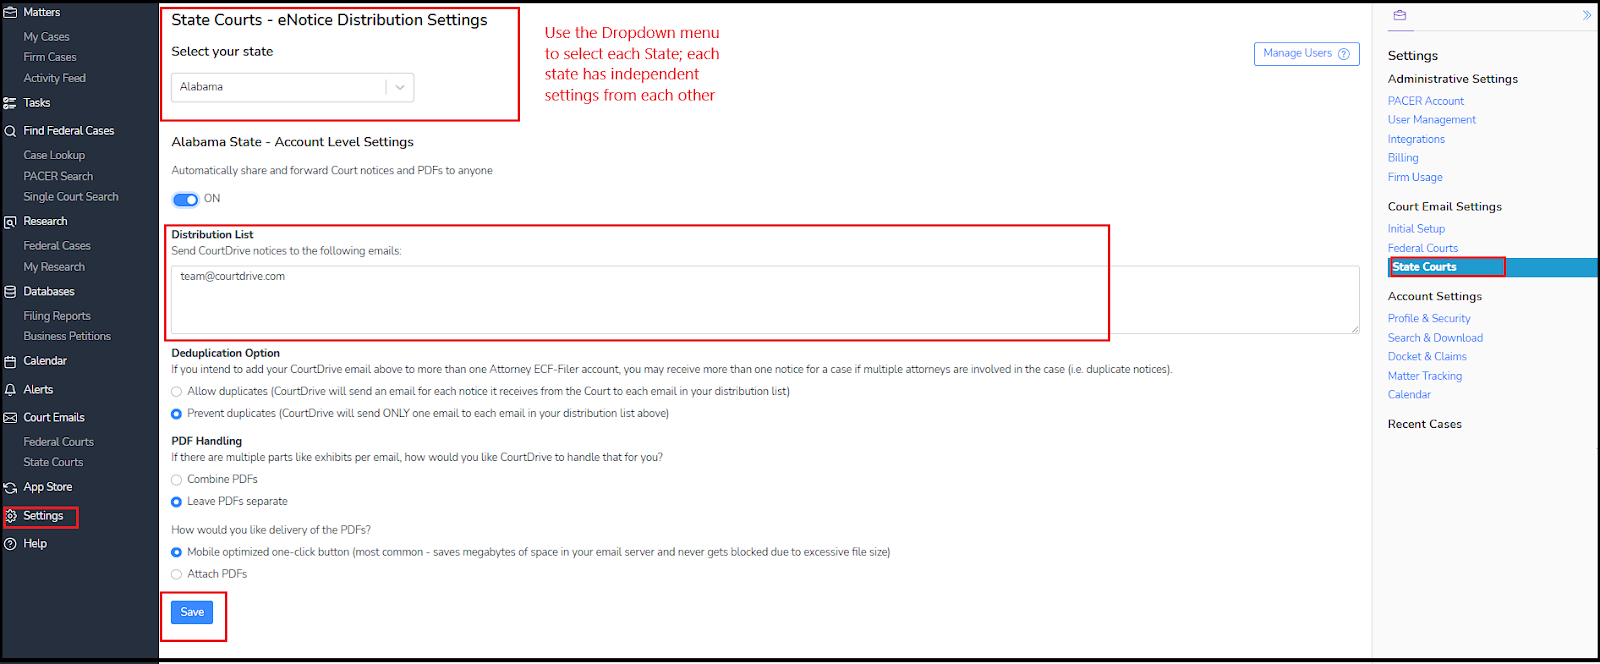
You can also decide:
- how you want multiple PDFs handled (such as exhibits in a single eNoticel). You may leave each exhibit as a separate PDF, or have them auto-combined into one PDF:
- how you want delivery of the PDFs. We recommend the mobile optimized version with a one-click access button (most common - saves megabytes of space in your email server and never gets blocked due to excessive file size). You can also select to attach PDFs.
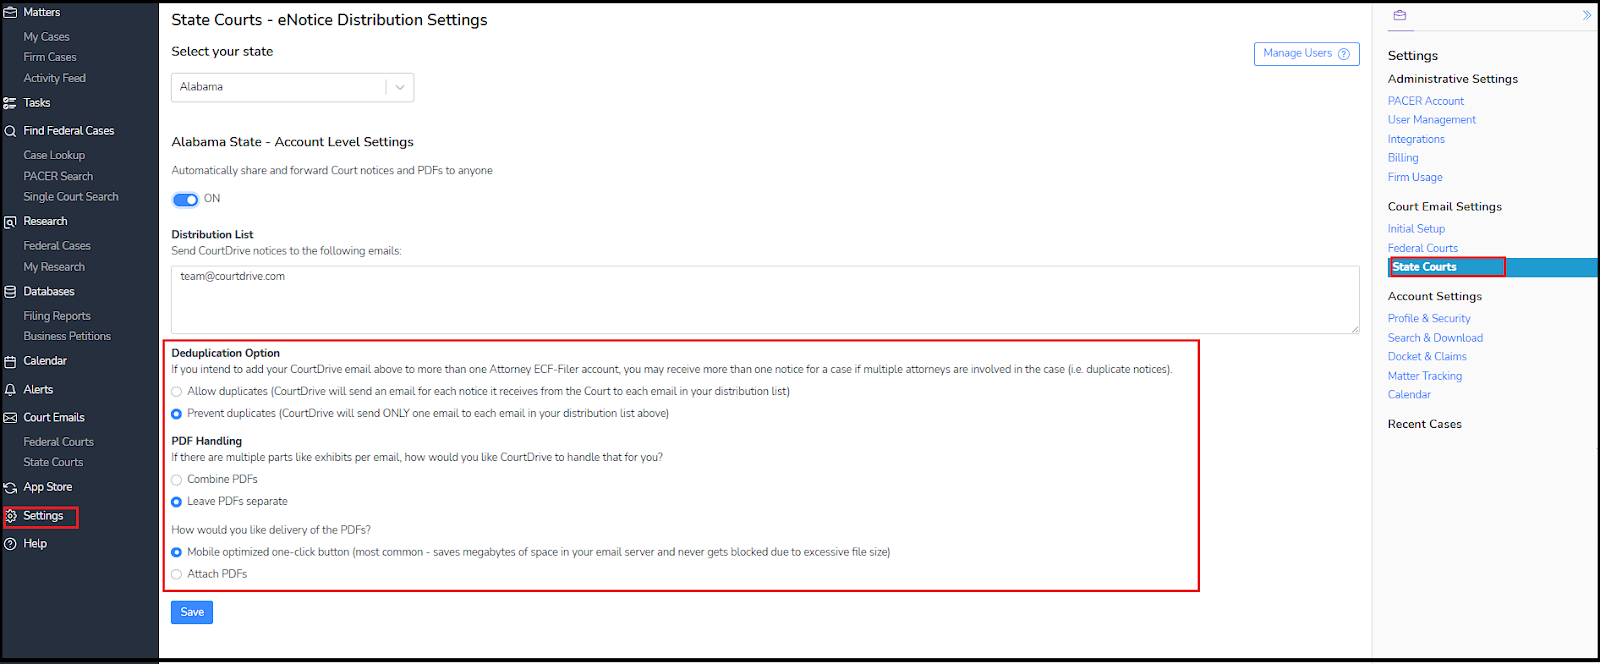
Make sure you click the Save button when you make changes to your settings
eNotice Sharing per Case
You can receive and distribute eNotices for a specific case only. Your ability to edit distribution lists for each case will depend on whether or not you have administrator rights.
If your user account has admin permissions:
You can edit distribution lists (and other eNotice settings) for anyone in the firm. Visit the Firm Cases and notice the column marked eNotices:

Click on any mail icon to open the settings dialogue:
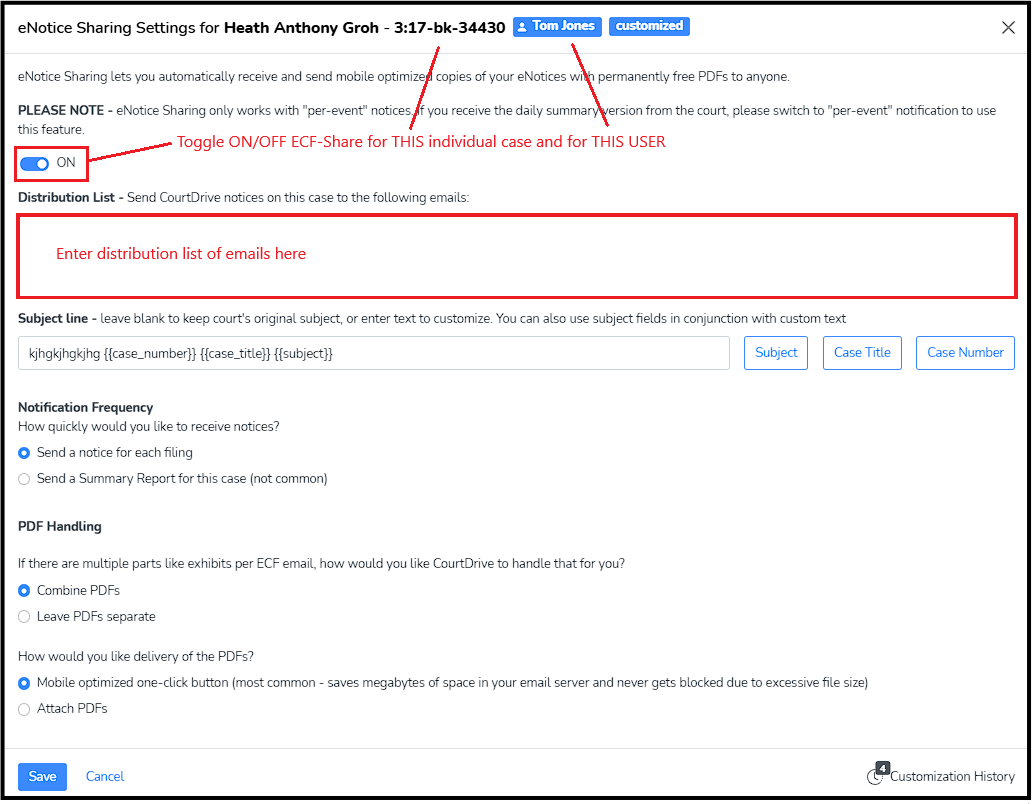
Enter a distribution list, edit the settings as desired and click the Save button as shown above.
If your user account does NOT have admin permissions:
You can only edit your own settings (as shown in the settings dialogue above), or you can add/remove yourself to any colleagues distribution list.
In the My Cases section, the next to last column titled eNotices shows you the status of your eNotices for each of your cases:

If CourtDrive is receiving notices for you on a specific case, you can edit the share settings for that specific case by clicking on the email icon. This will open the settings dialogue where you can edit the settings (same as the image shown above for administrators). If CourtDrive has not received any notices for you on a case, you cannot edit settings for that case. Hovering over the email icon will show you the current settings for that case.
In the Firm Cases, if you click on a mail icon for another user, you will add yourself to that case's distribution list to receive CourtDrive's copy of the eNotices. Click again to remove yourself from the distribution list.
To edit your eNotice settings globally instead of per case, visit your account settings as explained above. You would want to do this for example if you wanted ALL of your notices to be sent to your staff. However, if a specific client wants to get copies of everything filed in a case, you would edit the eNotice settings on a per case basis.
Court Emails Inbox
Your eNotice emails received by CourtDrive can be viewed from our Court Emails inbox, which is separated for Federal and State. Here you will find a chronological order of eNotices received on your behalf.
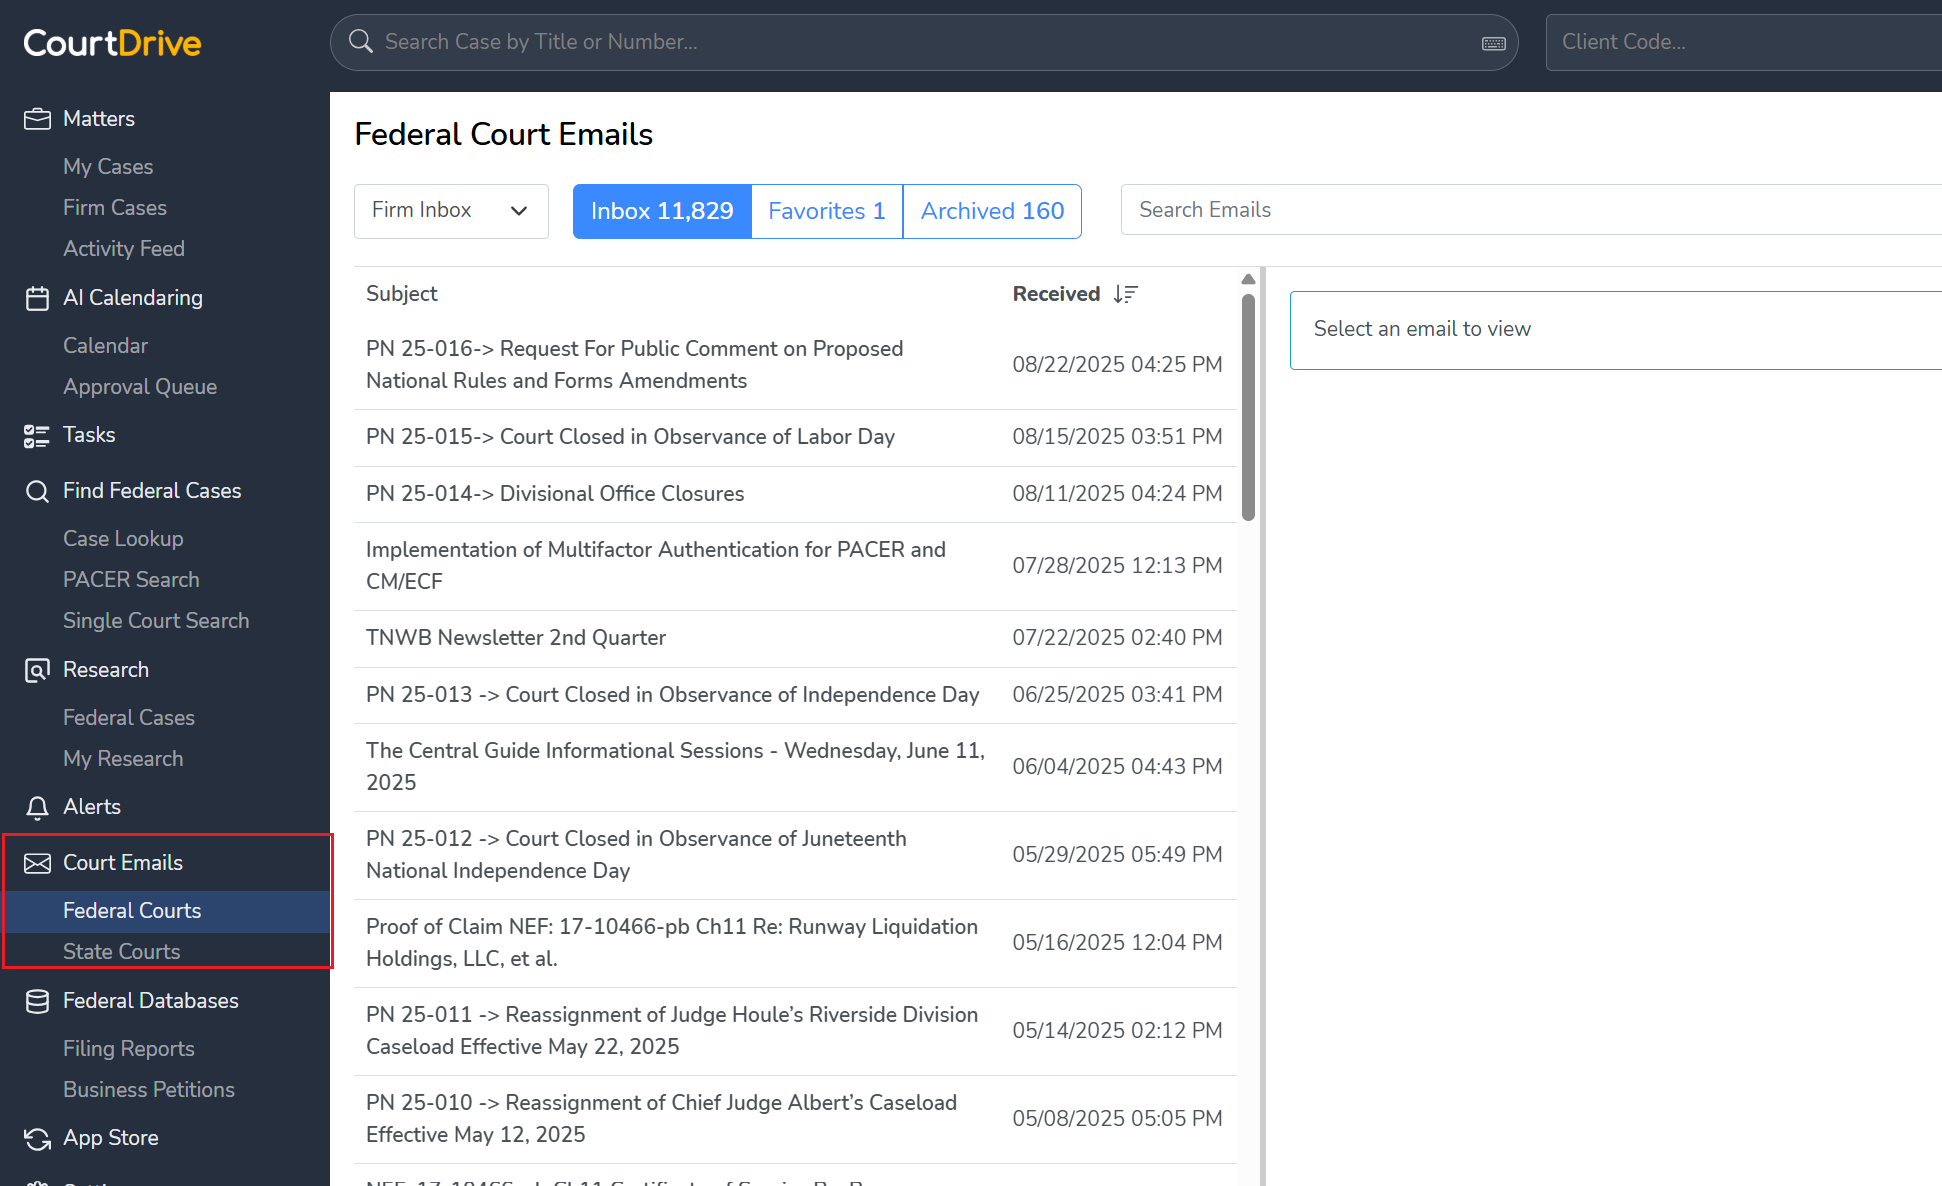
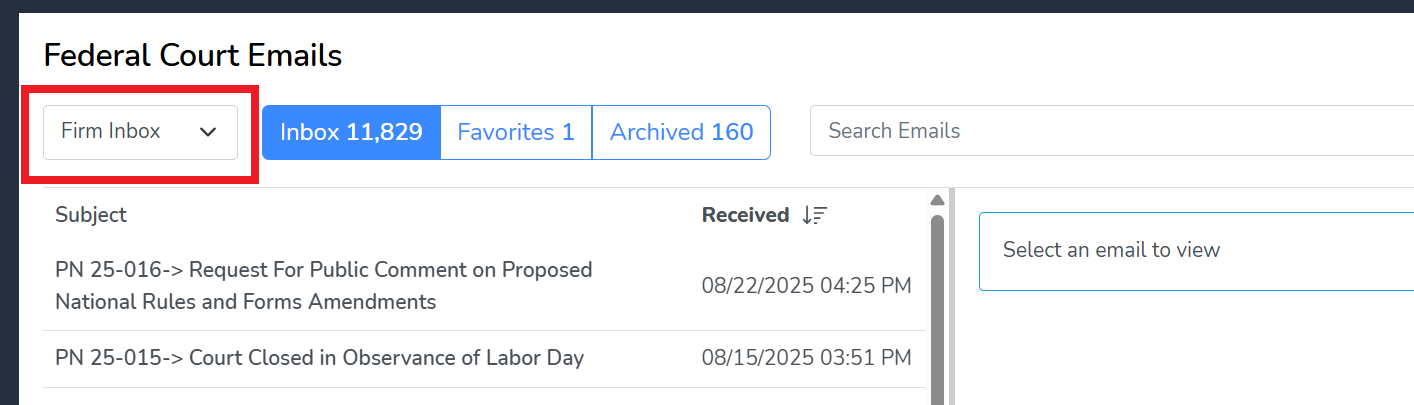
Note that you can choose between "My Inbox" or "Firm Inbox," so even if CourtDrive has not received any eNotices for you, you can see any and all eNotices received for anyone in your firm.
To view the contents of the email, select the email as shown under the Subject line:
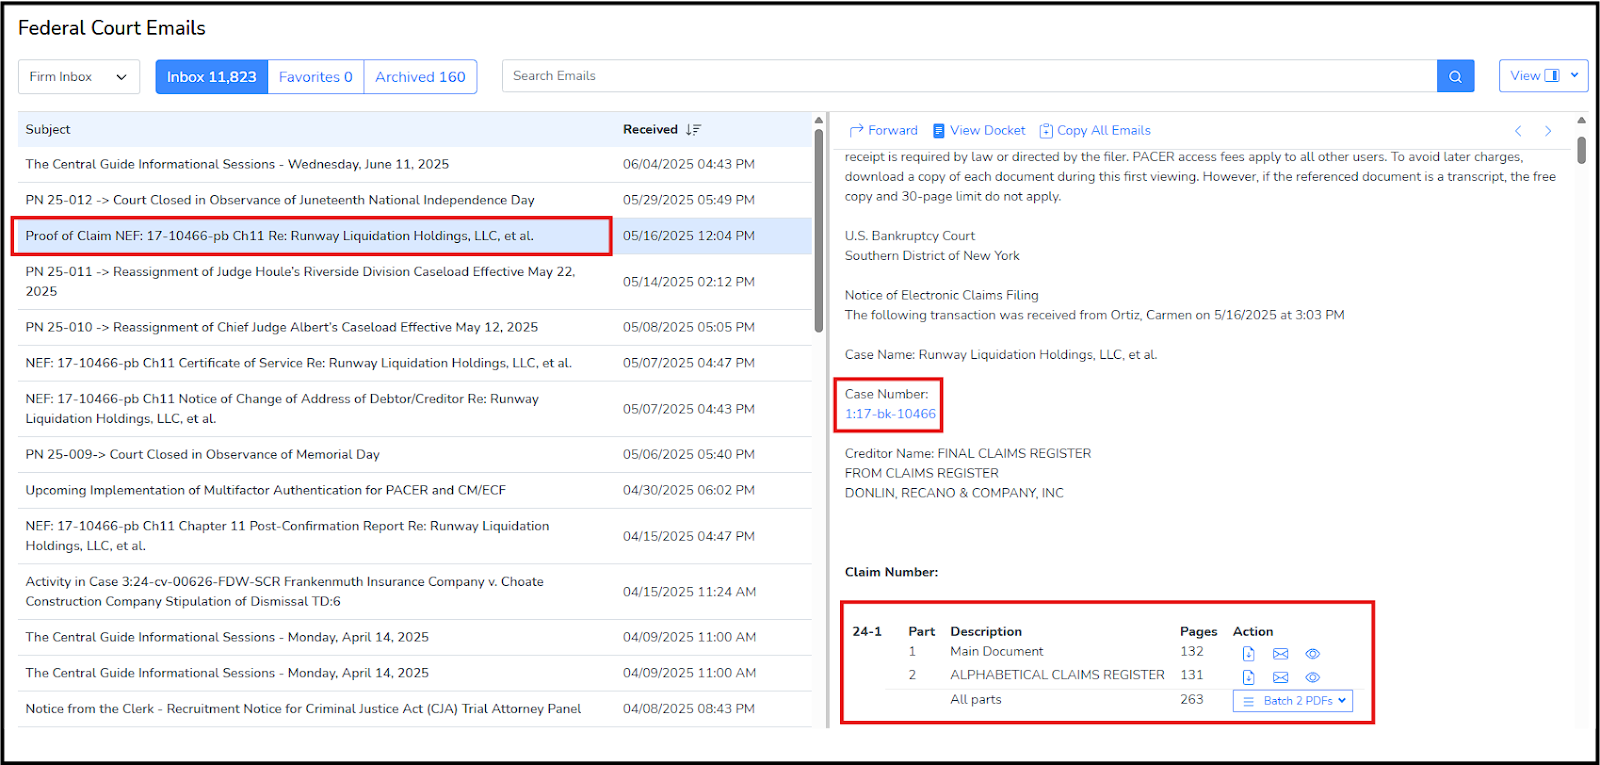
If the eNotice had a one free look PDF link from the court, CourtDrive will automatically save and download that PDF for you. From the detailed view, you can, for free, download, email, preview or download an OCR version of the email by clicking each of the corresponding icons as seen in the body of the email (above).
Multi-Case eNotices
In some cases, the courts will send eNotices that contain updates on multiple cases (shown below). For these types of eNotices, the court only provides a free look for the first case listed:
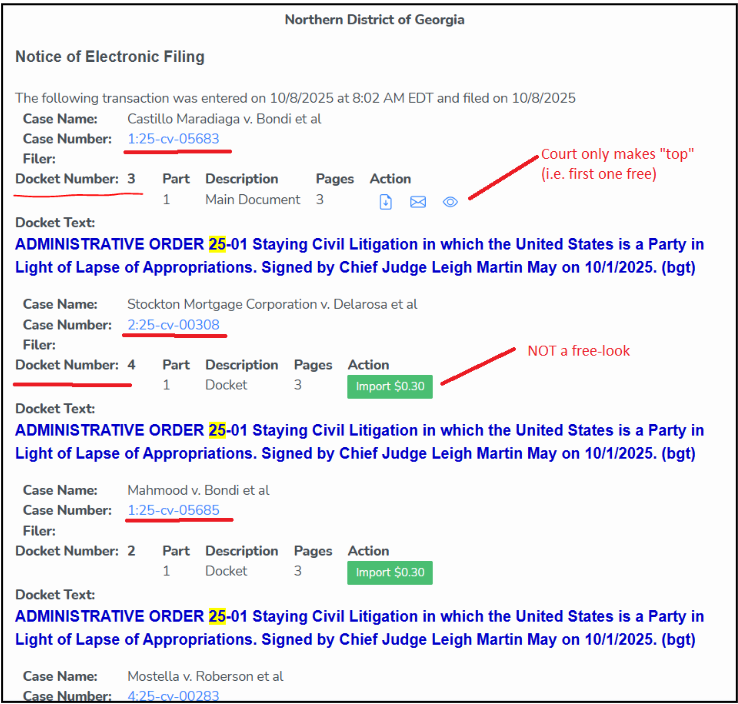
As such, CourtDrive can only store and provide you the free look for the first case; if you need the PDF for any of the subsequent cases, you need to manually import them from PACER and pay the associated PACER fee.