Connecting an App
The following instructions apply to Clio, NetDocuments, iManage, SharePoint, RocketMatter, Box, DropBox, Google Drive, and OneDrive. Additional instructions are provided for NetDocs and iManage further below on this page.
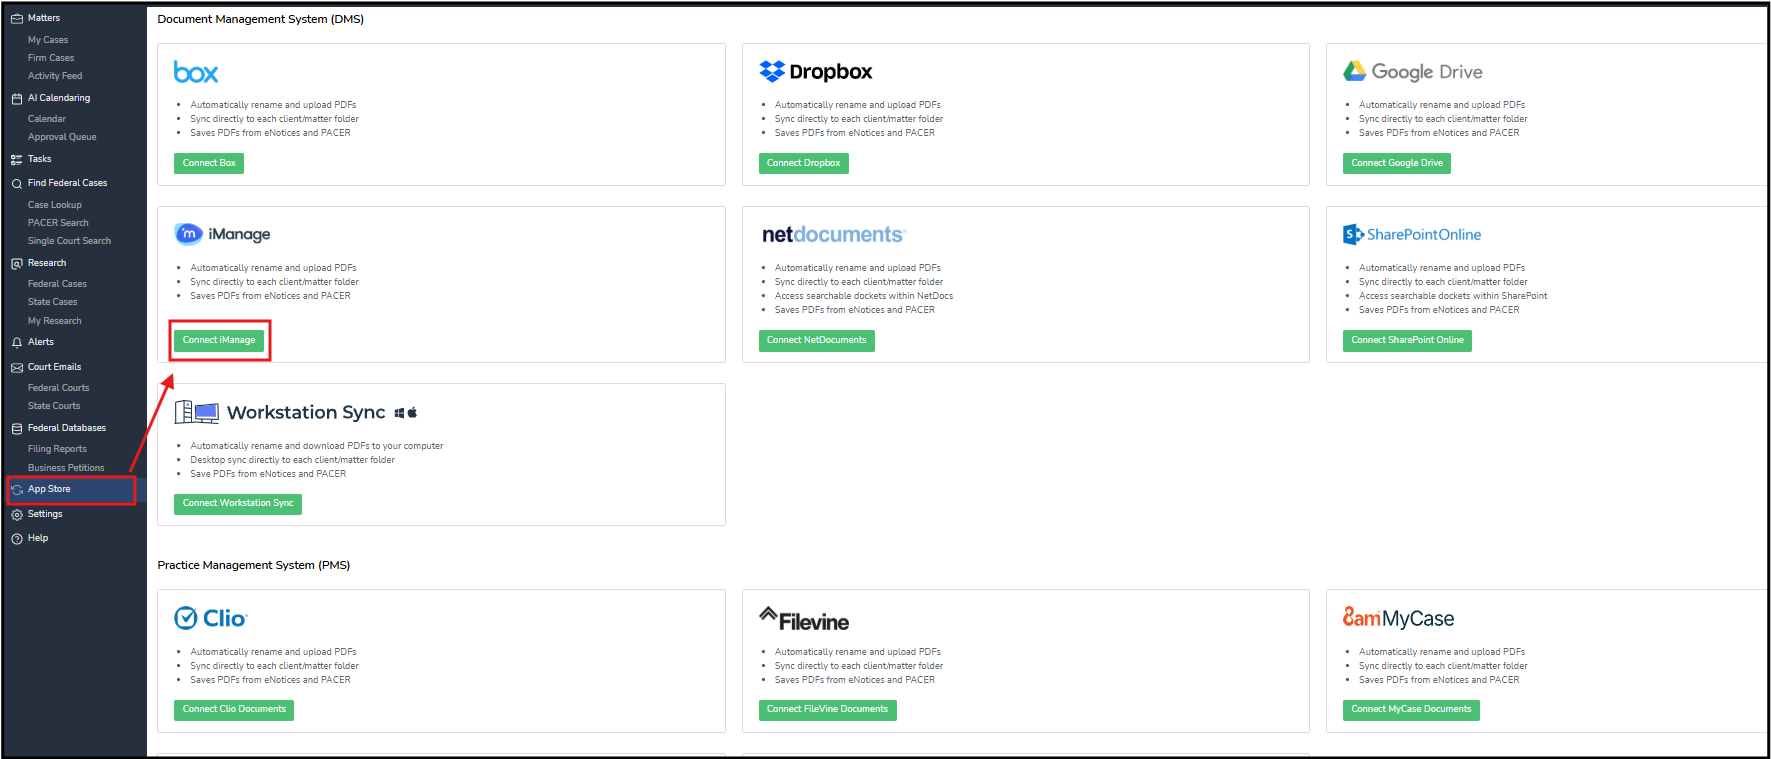
Visit the App Store from the left navigation and select the App you want to connect by clicking on the green Connect button:
You will be prompted to authenticate into the service you choose. Once authenticated / verified by the third party service, the authentication dialogue will close and you will be taken to the global setting page for that service.
For certain Apps, you will have the choice of giving full or partial access to CourtDrive. If you want CourtDrive to upload PDFs into a specific folder of your choosing (i.e. each PDF goes to a corresponding client-matter folder that you will designate), you must choose full access. If however you want CourtDrive to create new folders for each of your cases and upload the PDFs into a folder for each case, you may choose limited access:

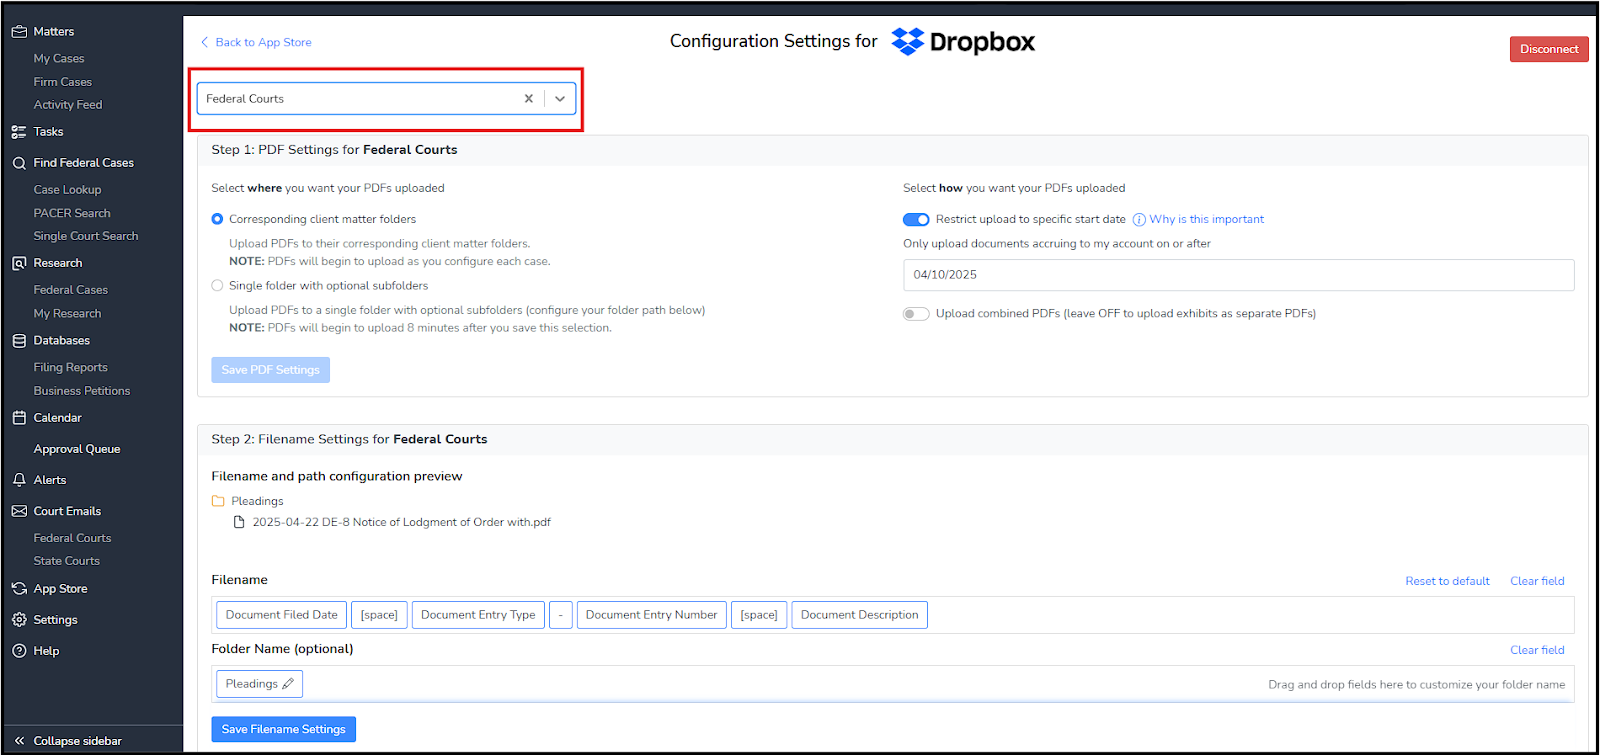
Global Settings
For any service you connect to, you will need to configure global settings, i.e. settings that affect how the automatic syncing works for all your cases on CourtDrive. There are also "per case" settings you can use, covered in the "Mapping a Case" section below.
Global settings are almost all the same for all services, as exemplified by the DropBox settings shown below (there are a few services that have additional options and are covered in further detail down below on this page):
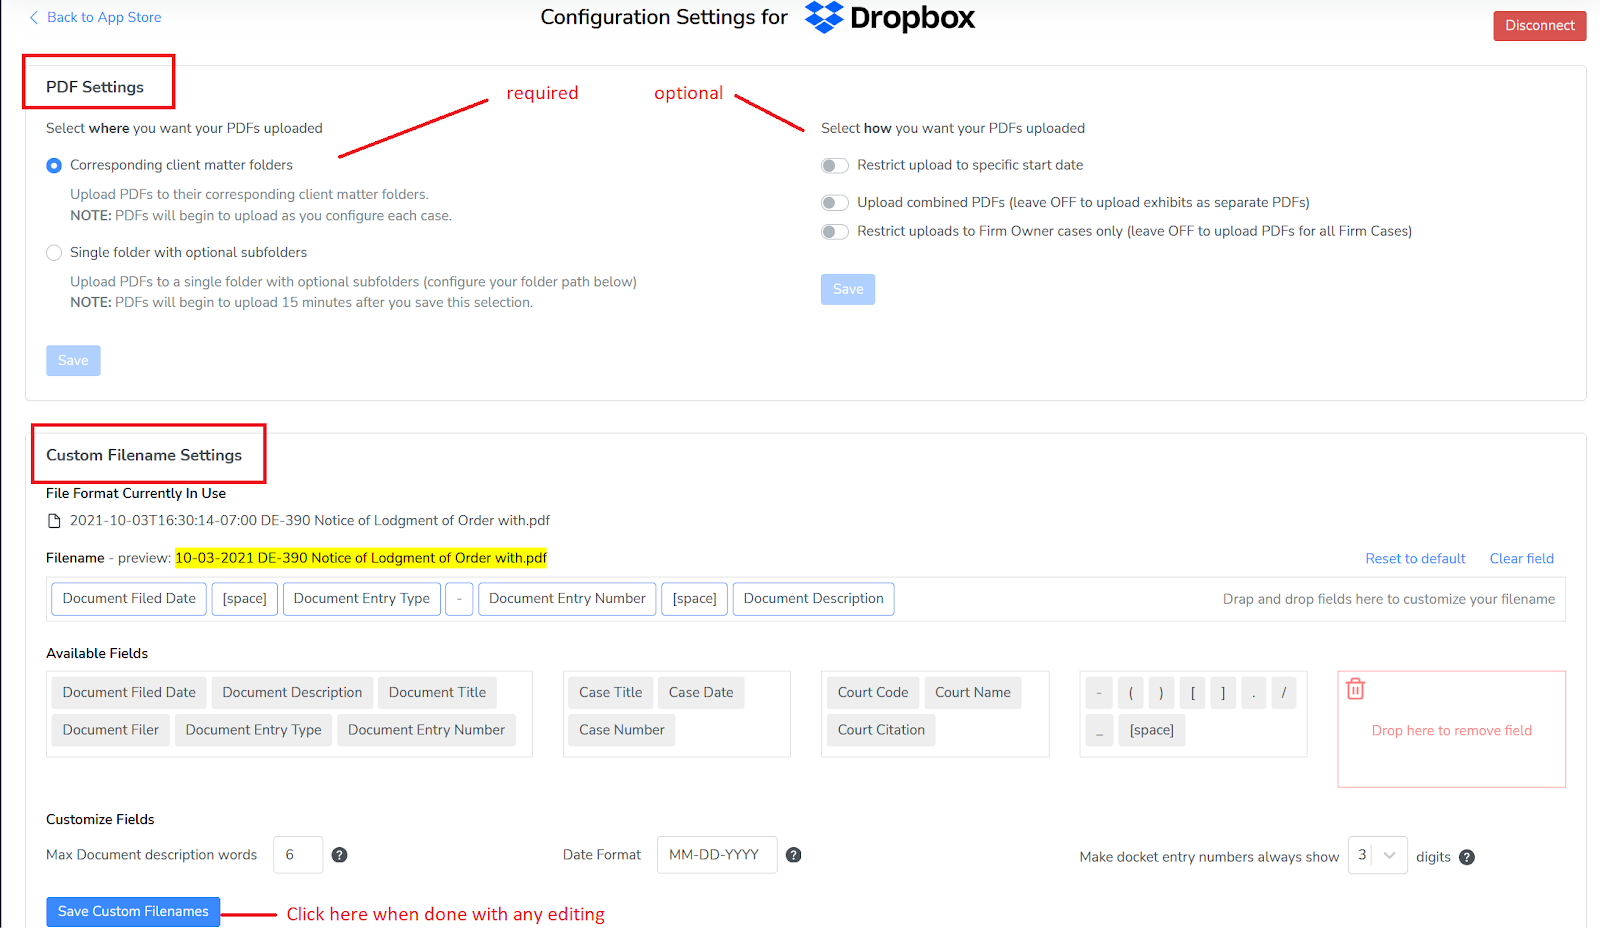
Step 1: You must first select WHERE you want your PDFs uploaded.
Step 2 - optional: You may then select HOW you want them uploaded through various options.
Step 3 - optional: You may edit the naming convention of your PDFs so that CourtDrive will rename it to your liking prior to uploading to your service. You may drag and drop fields to reorder, add or remove them.
Mapping a Case
If you select to have CourtDrive upload PDFs to your existing client folders, then you must do a one-time set up for each case you want synced. Using simple select boxes as shown below, you need to link each case on CourtDrive to your desired folder in the third-party application (Clio, Box, DropBox, etc.). The process of linking a case on CourtDrive to a folder on your third-party app is called "mapping."
First, from the Firm Cases, sort or search to find the cases you want to map. Then click on the gear icon under the Apps Column to open the configuration window (NOTE: only Admins have access to the Apps column):

Second, in the configuration window, select the folder you want your PDFs uploaded to and click save and shown below:
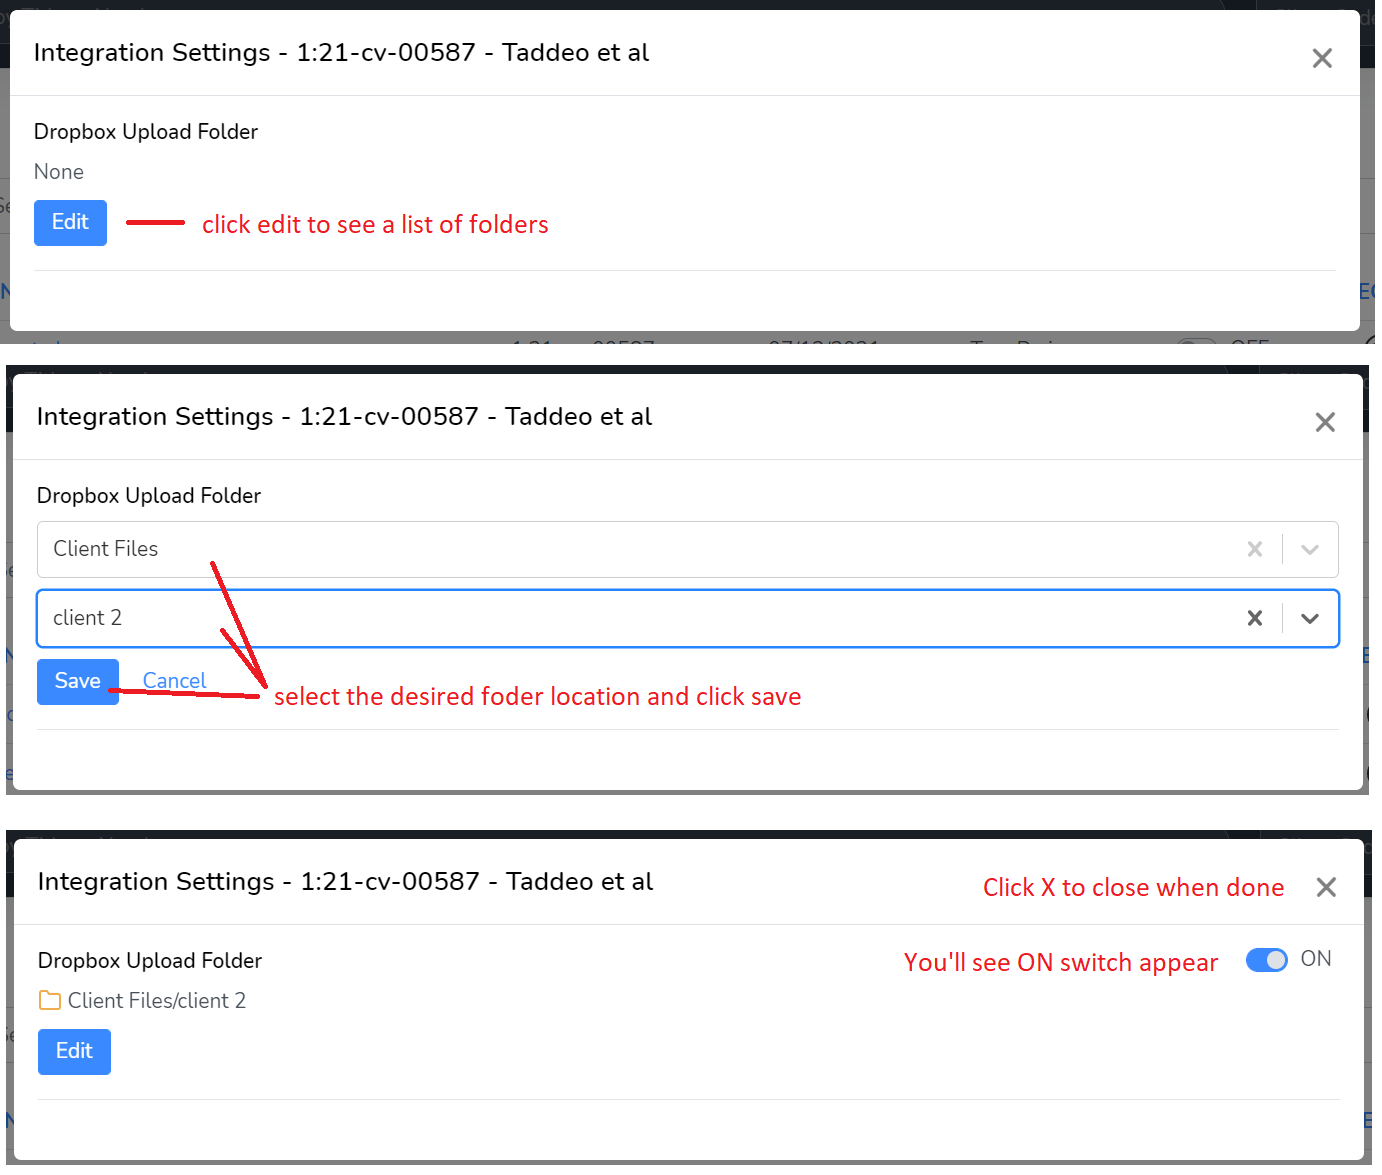
After clicking save, you can close the dialogue. In the future if you want to stop syncing this case, click the ON switch to turn OFF.
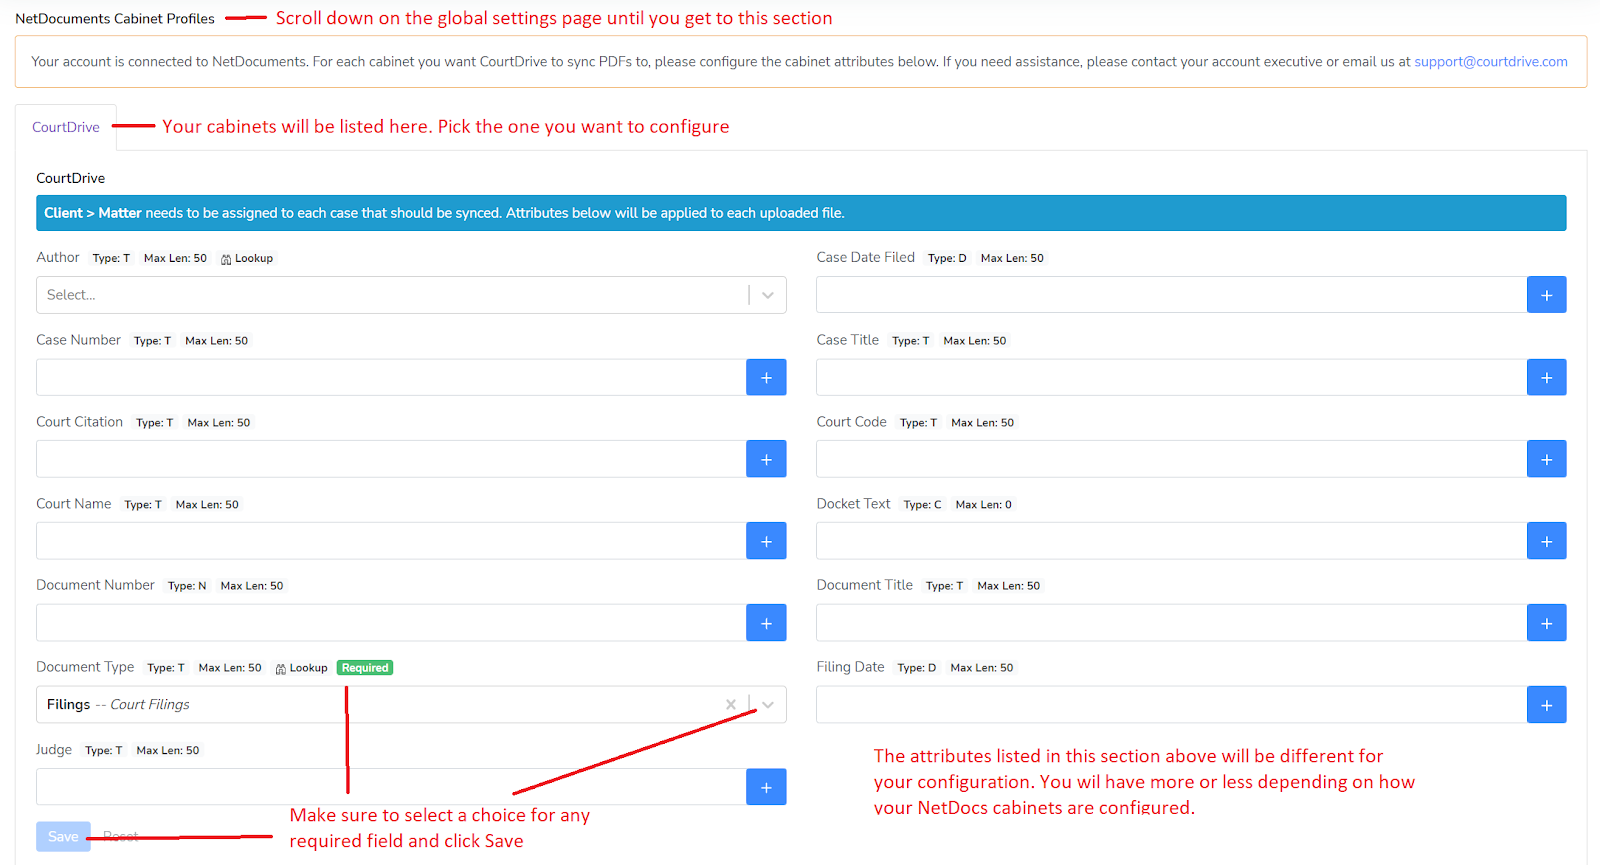
NetDocuments Setup
NetDocuments has additional configuration options explained below.
On the global settings page (from the App store OR from Admin settings), you will need to configure NetDocs cabinet attributes:
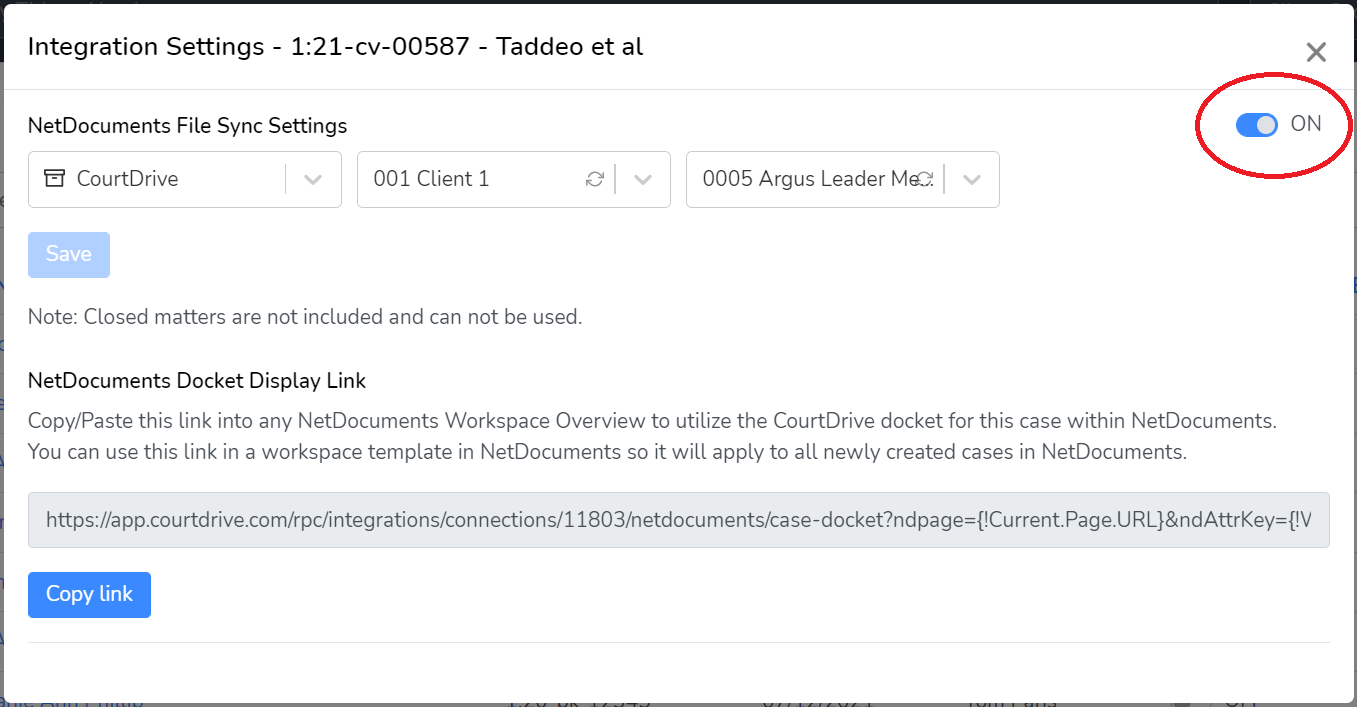
When mapping a case, you will select a workspace:
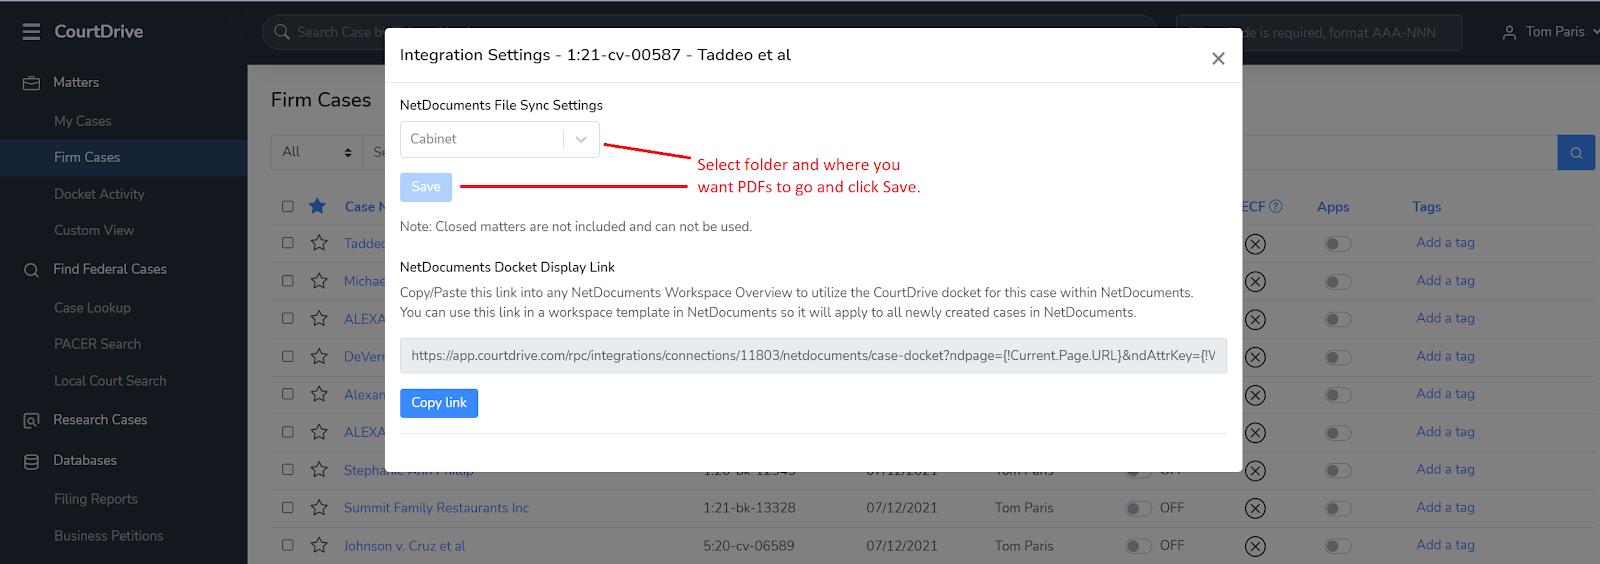
Once you save the workspace, you will see an ON switch appear so you know the mapping is complete:
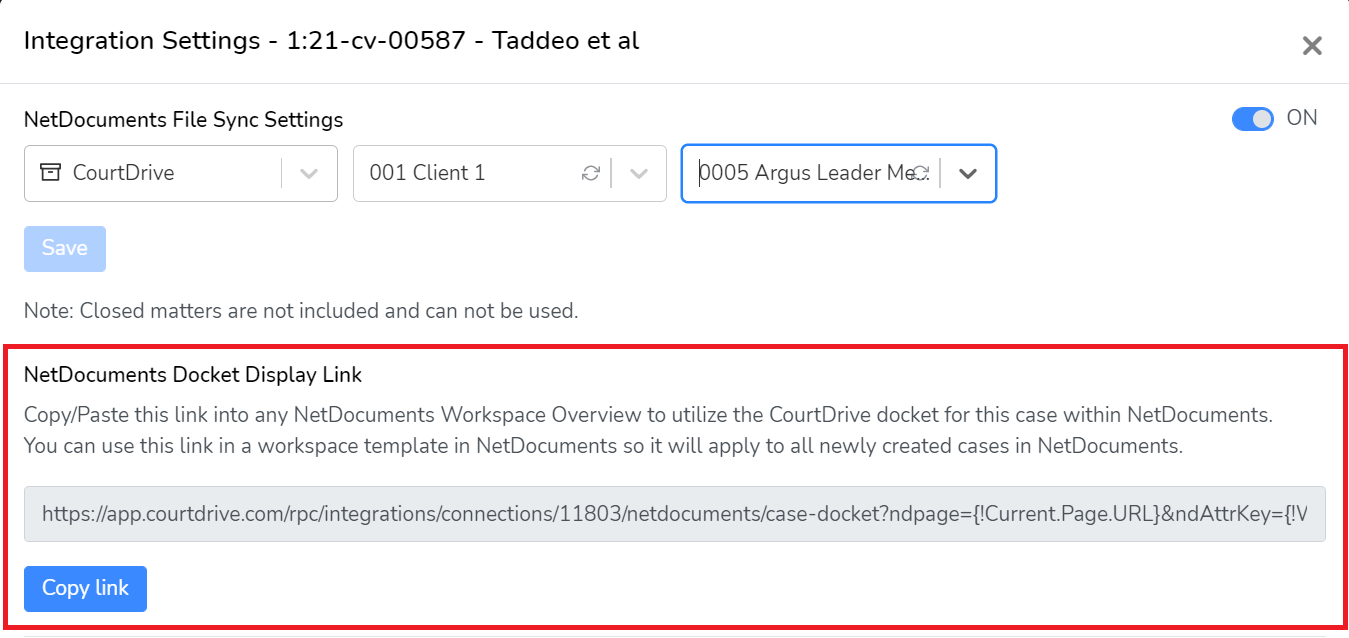
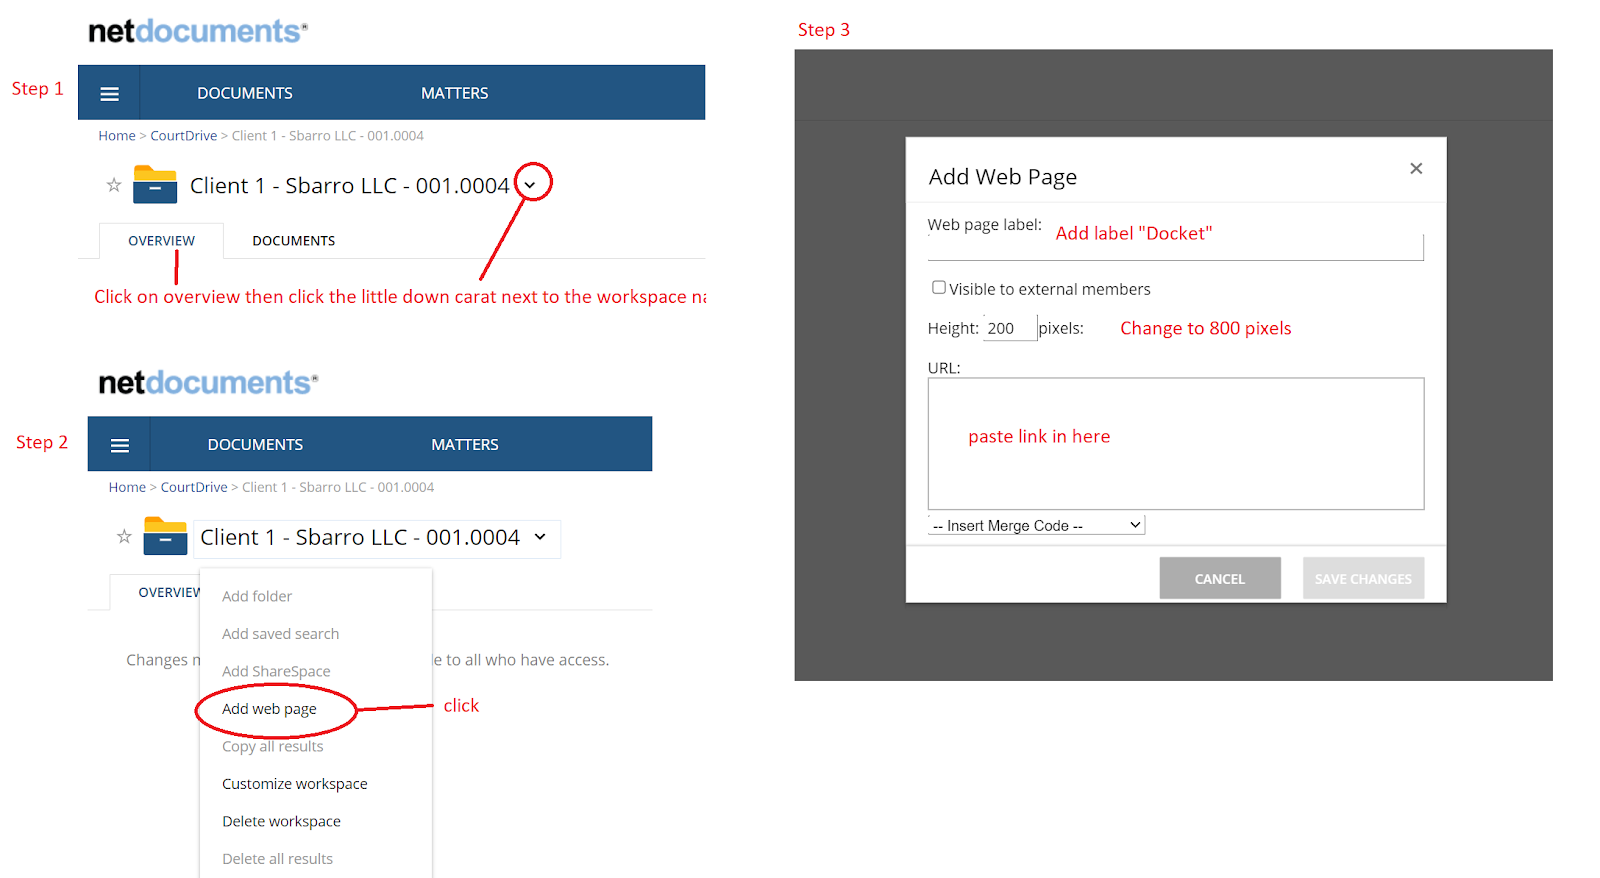
Our NetDocs integration also provides the ability to access the CourtDrive docket (complete with searching and downloading) within NetDocuments itself. Just copy the docket display link into NetDocs for any workspace you want by clicking the blue Copy Link button shown below:
Paste the link into NetDoc's workspace overview section by clicking "add web page" and following the steps in the image below:
NOTE: If you have NetDocuments administrative rights, you can use this link in a workspace template in NetDocuments so it will apply to all newly created cases in NetDocuments.
iManage On-Prem Setup
The iManage admin for the firm needs to first add and enable the CourtDrive application in the iManage Admin Control Center.
Download the CourtDrive App bundle here.
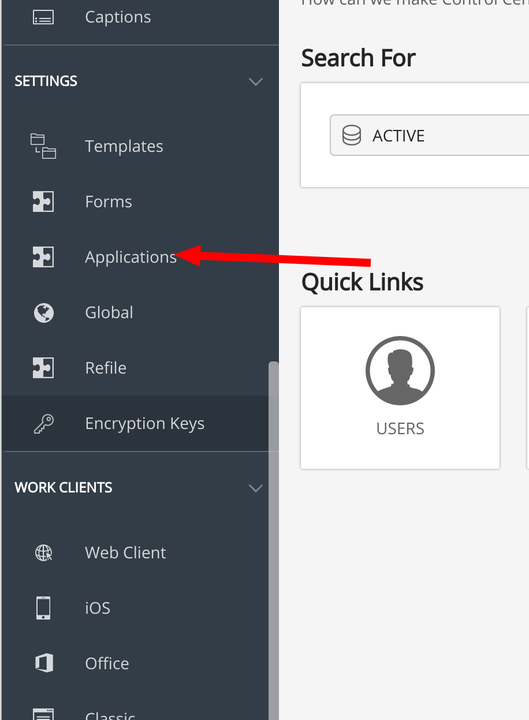
Step 1: In your iManage installation, go to /work/cc as shown below:
Step 2: Scroll down the left side and click Applications for the next screen.
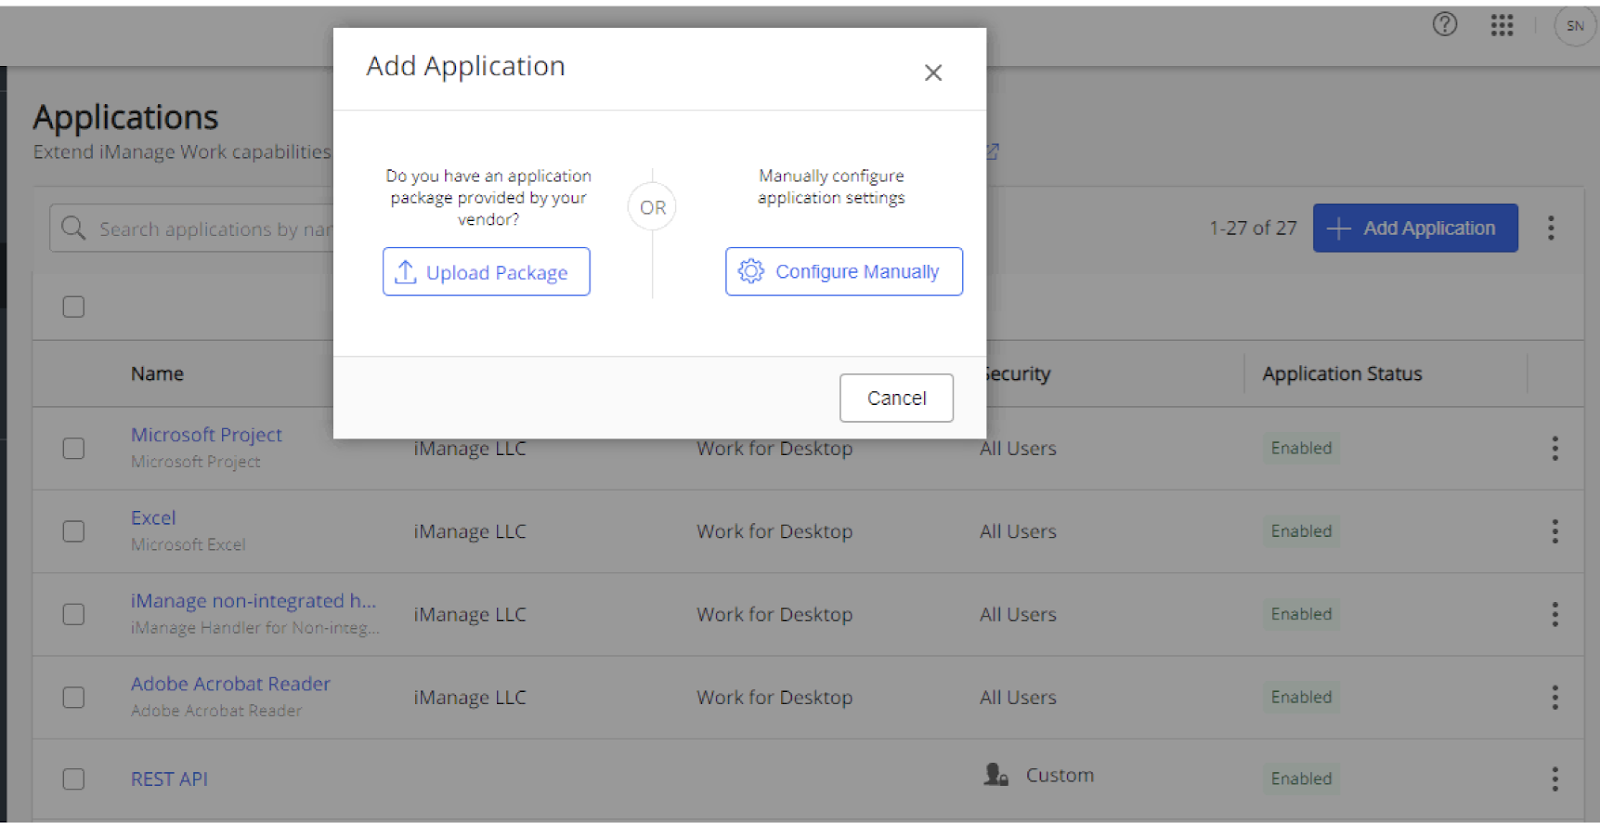
Step 3: Upload the application bundle provided by CourtDrive (download at top of this article):
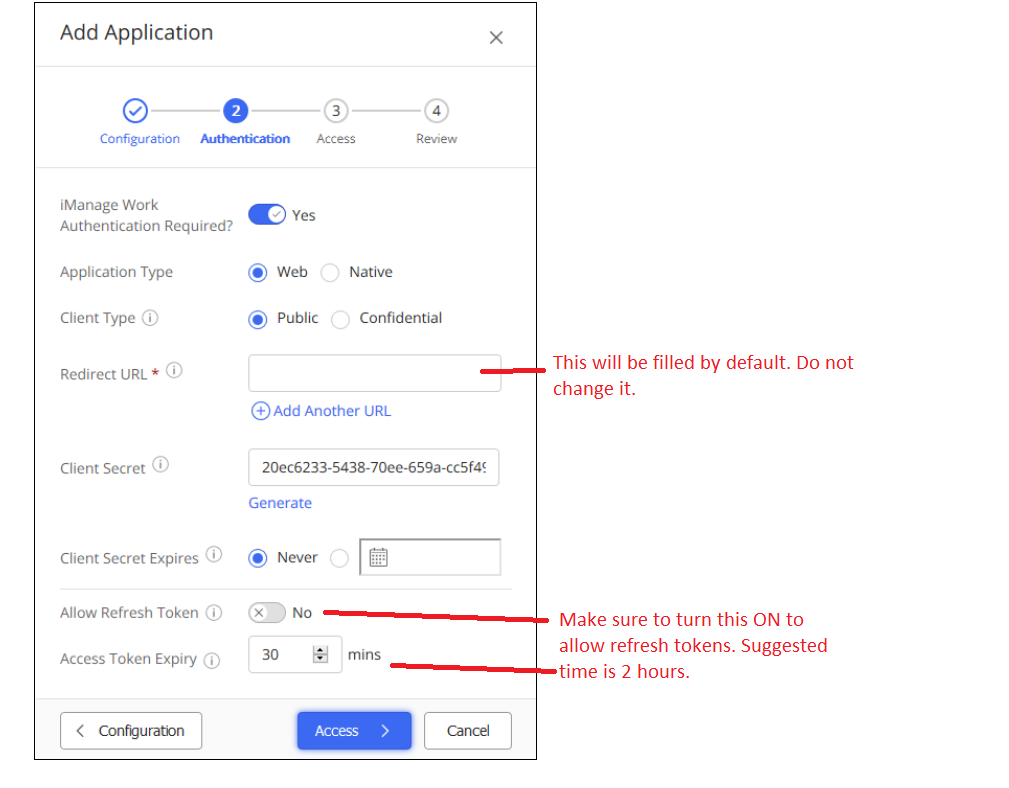
Step 4: Proceed through the configuration steps by leaving the defaults in place except as follows:
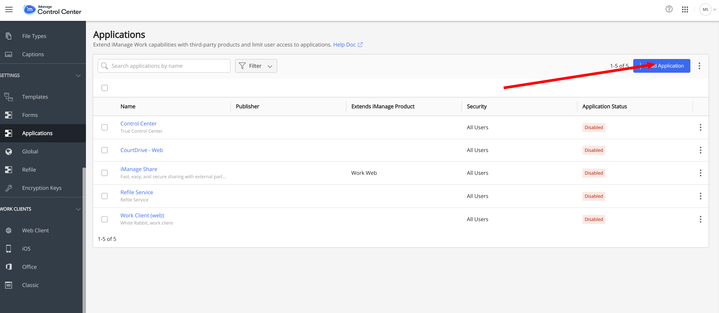
Step 5: After uploading the CourtDrive app bundle, click “Add Application” as shown below to open a list of vendors to choose from:
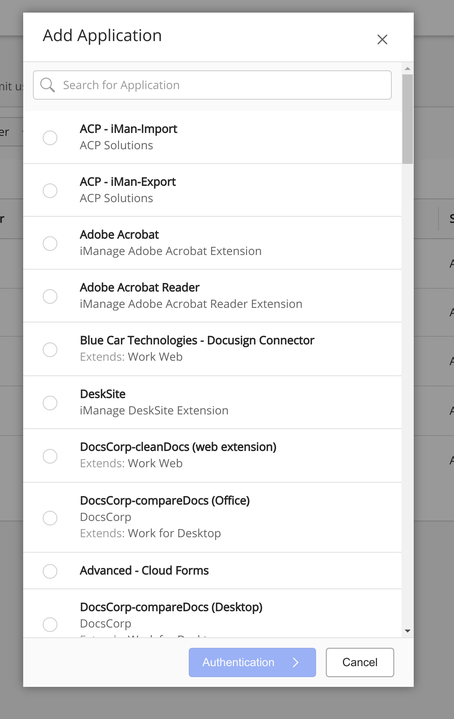
Step 6: Search for CourtDrive (use search box and type if scrolling doesn’t show it) and add the CourtDrive application to your iManage Control Center.
Step 7: Once added to your iManage Control Center, THEN you should be able to login and enable the iManage App on CourtDrive through the App Store.
Continue to setup your CourtDrive-iManage integration by following the instructions for iManage Cloud setup below.
To learn more about adding an application package to iManage, view the iManage documentation here.
iManage Cloud Setup
Depending on whether you are using iManage cloud, or iManage on-prem, your setup will be different. If you are using an on-prem version of iManage, make sure you read the section above first, then continue to this section. Otherwise, the instructions below will guide you through setting up our integration for iManage cloud instances.
From the App Store (left nav) click on the green "Connect" button for iManage. You will be prompted for your iManage server name.
NOTE: Do NOT include "https://" when entering the server name:
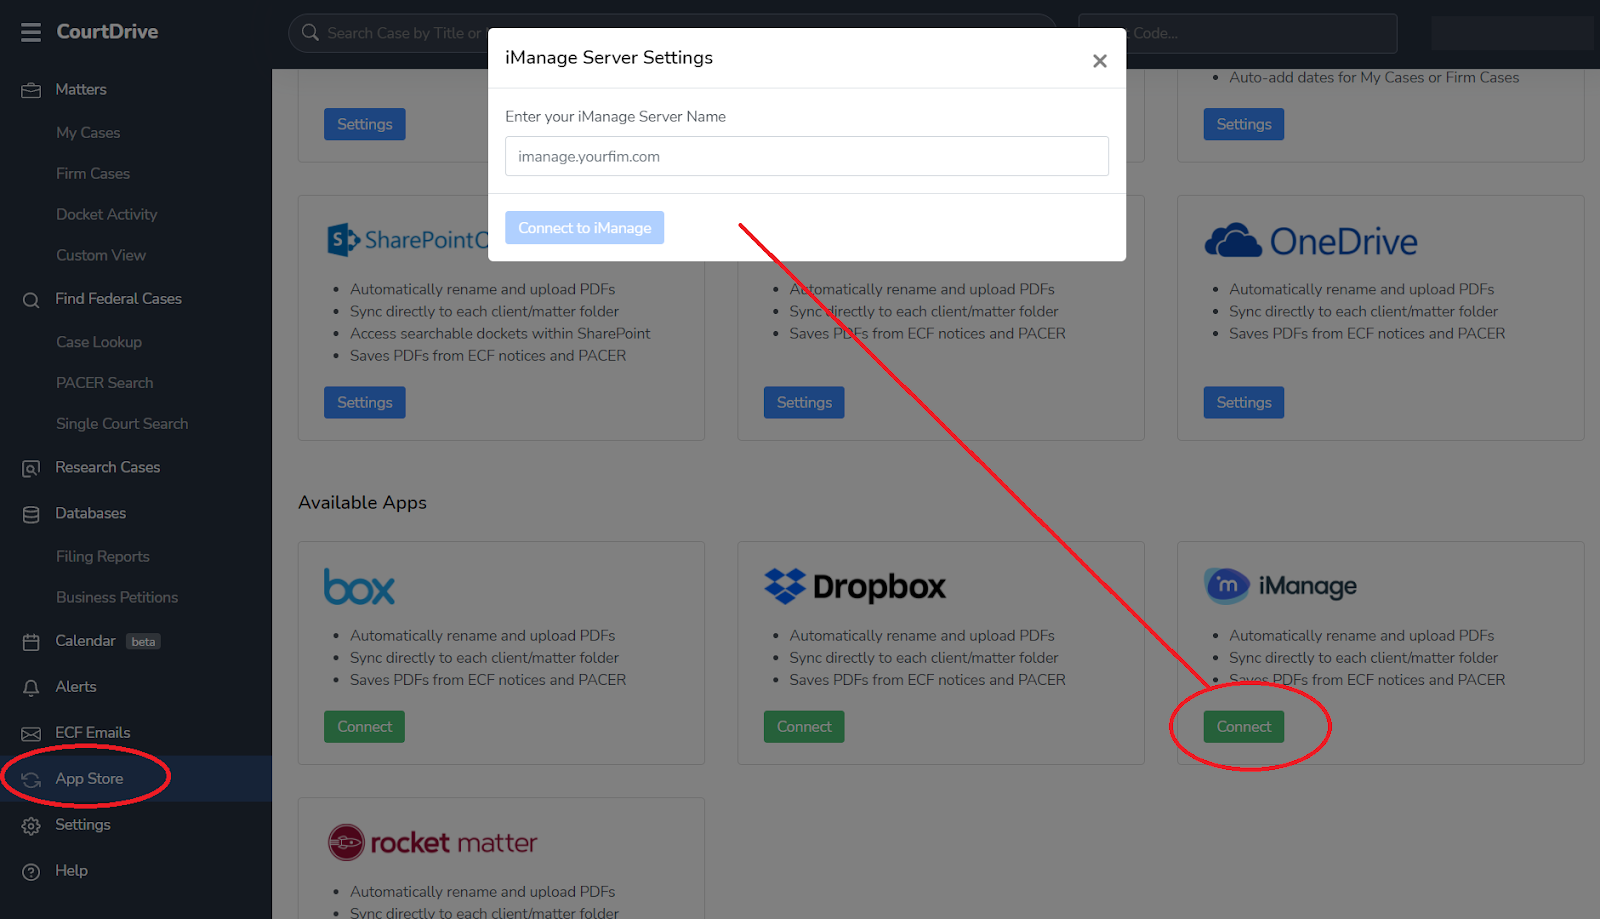
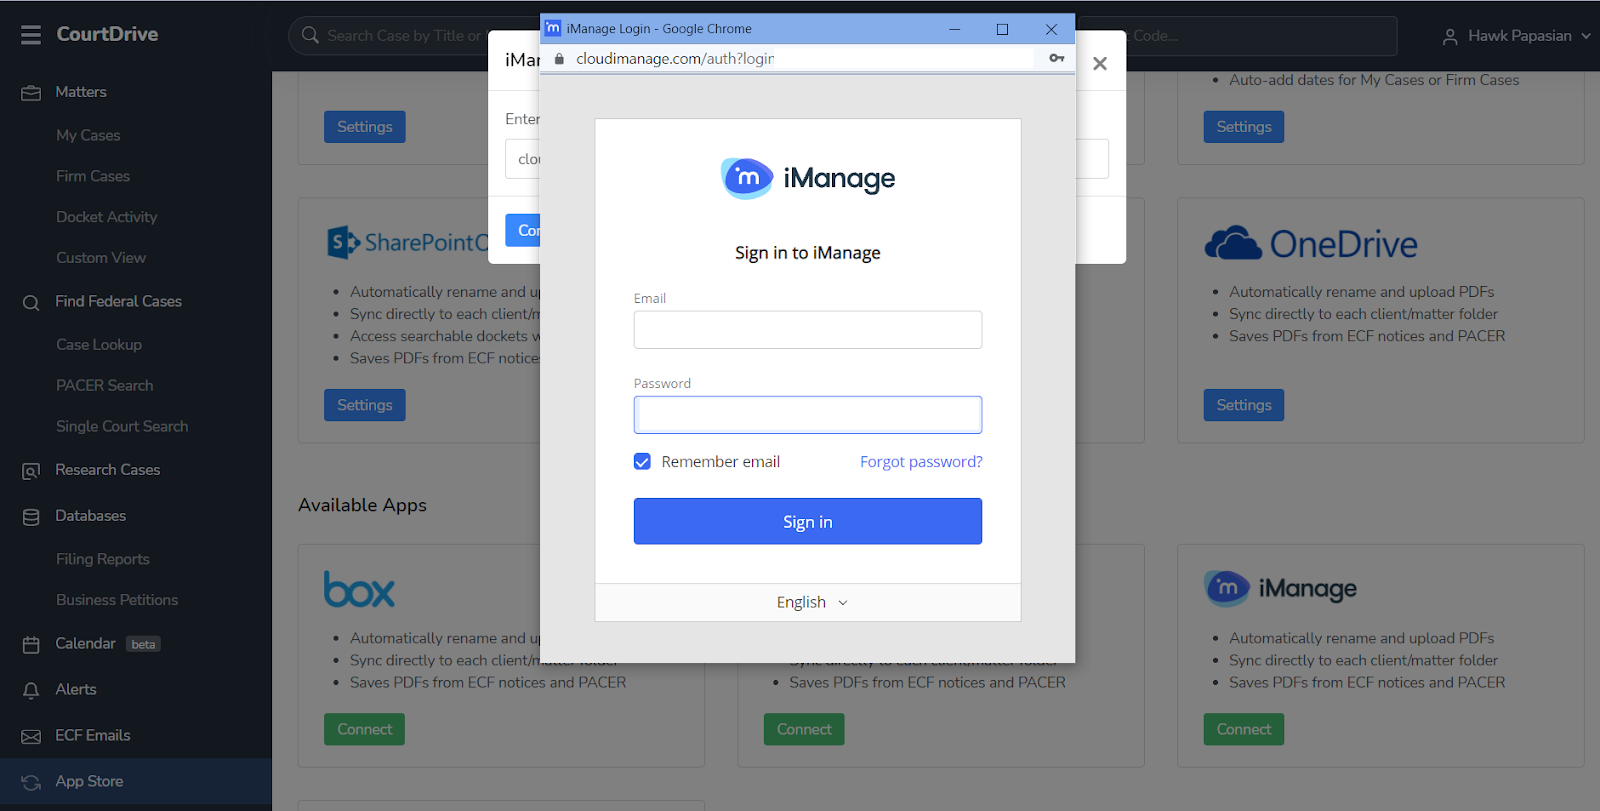
After you enter the server name and click "Connect to iManage" you will be prompted to login to iManage.
Make sure you log in to the account with the correct permissions to access the desired workspaces. Thereafter you will get to the iManage settings page where you can customize how the PDFs are uploaded and how they are named before upload:
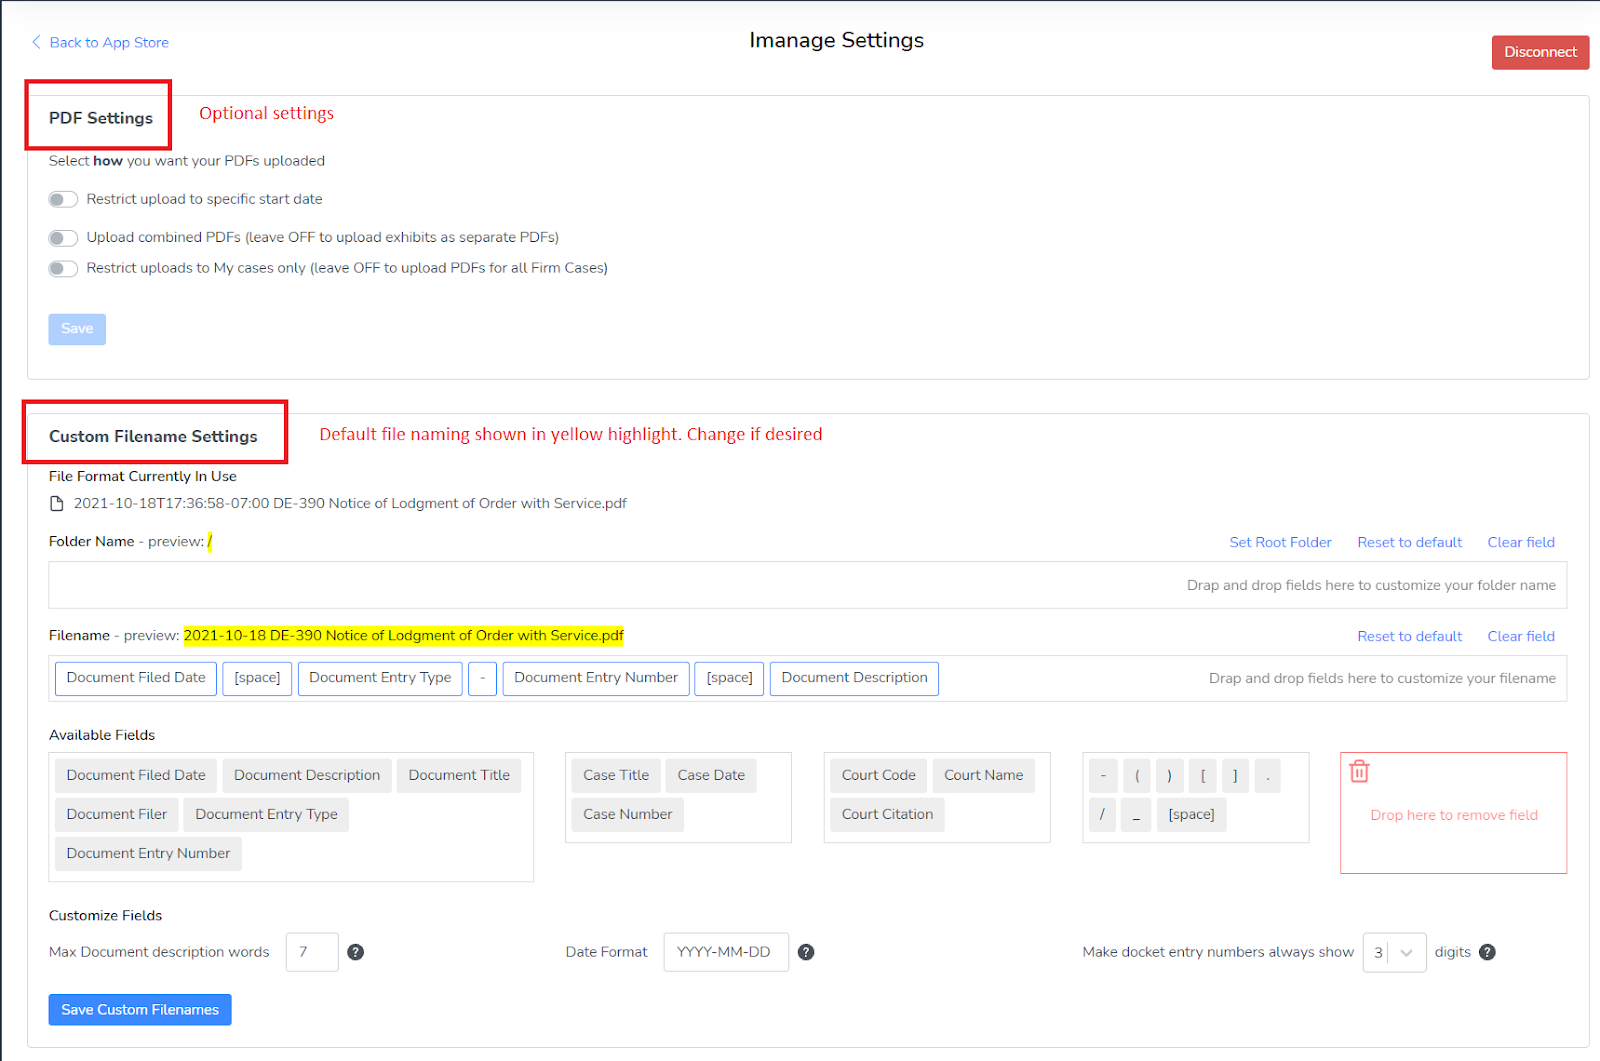
Should you edit any of the default settings, make sure to click Save where appropriate. Thereafter you may map cases you want synced as described above in the "Mapping a Case" section.
SharePoint Setup
SharePoint online is set up very similarly to other Apps. From the App store you select SharePoint and complete authentication. Thereafter you will see the settings screen for SharePoint and can configure your custom file naming convention. You would then proceed to mapping cases as explained above the section called "Mapping a Case"
With SharePoint you have an additional option to embed the CourtDrive Docket into any SharePoint page. Depending on your SharePoint version, instructions may vary a bit so for reference we provide you official Sharepoint instructions:
- Using web parts on SharePoint pages
- Add content to your page using the Embed web part
- Allow or restrict the ability to embed content on SharePoint pages (needed if you have security protocols preventing additions of web parts to SharePoint pages).
The summary of the foregoing is as follows:
- Go to the page for your case where you would like to add a docket.
- Click edit (typically top right) to go into edit mode for the page.
- Click the + symbol to add a webpart to the page
- Select to add the embed <> field to the page.
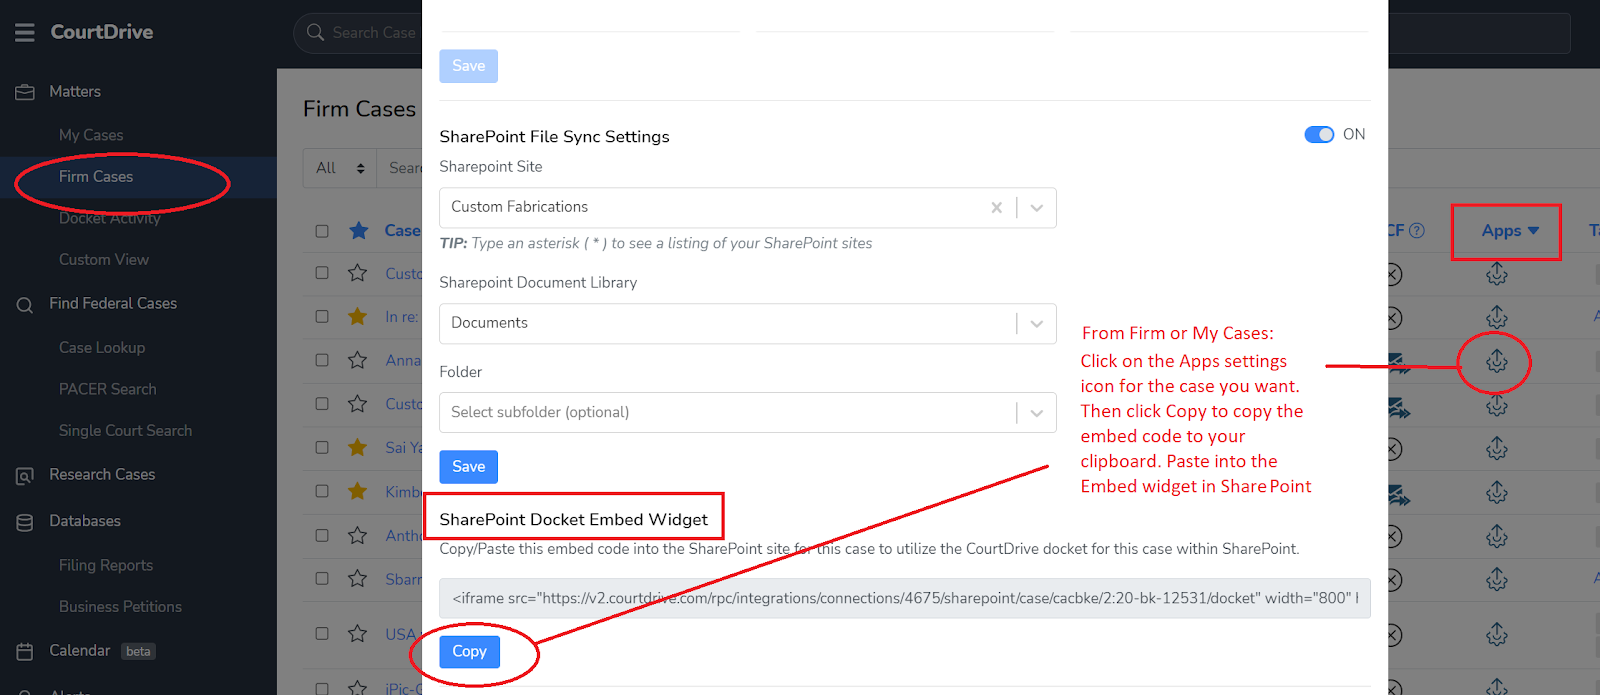
- Paste into the pane on the right the embed code CourtDrive provides and save. Below is shown how to copy the embed code for a given case on CourtDrive:
Copy the embed code from the Apps settings dialogue for a specific case as shown below:
After you save the embed web part to your SharePoint page, the CourtDrive docket will appear there.
Clio Setup
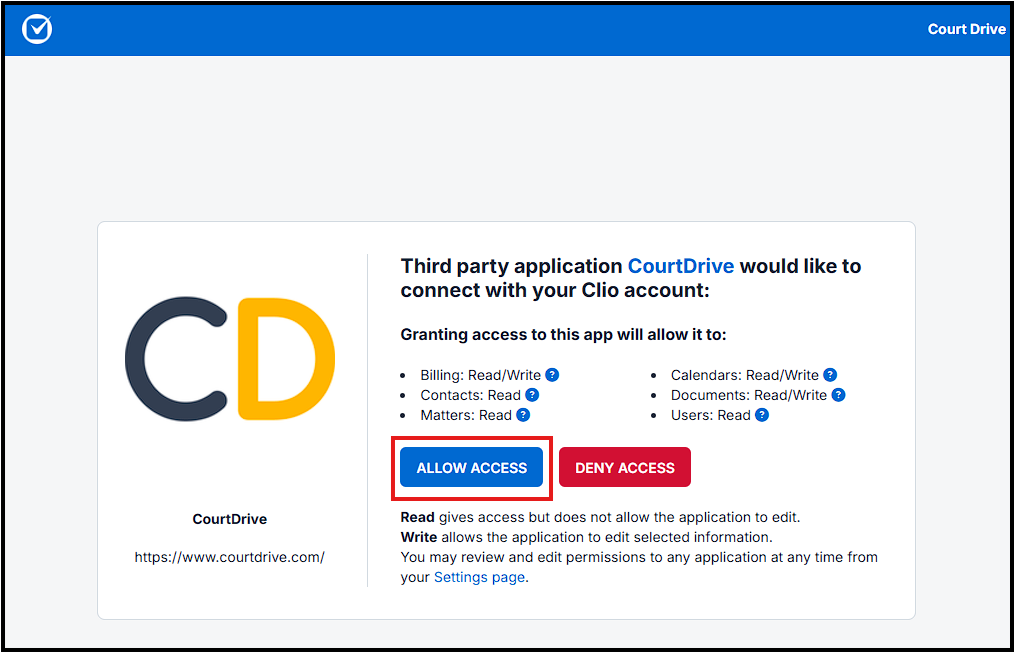
Once Clio is selected, you will need to allow access:
Once connected, you will set up integration preferences for individual court systems (ex/ Federal Courts, Florida State Court, etc). These courts can be selected via the dropdown menu at the top of the app page.

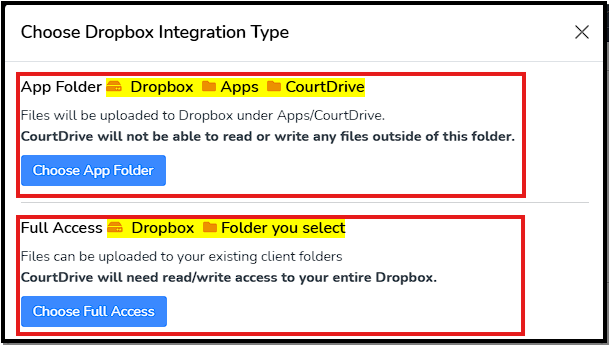
DropBox Setup
Once DropBox is selected, you will to choose one of the following Integration Type:
Option 1: App Folder
Creating an app folder in Dropbox; this is where all uploaded files will be stored.
CourtDrive will be unable to look outside this folder.
Option 2: Full Access
This will allow CourtDrive to place files in any folder within DropBox.
PLEASE NOTE: if you want CourtDrive to upload PDFs to specific client folders on a per case basis, you must choose “Full Access.” You will select the specific upload folder for each case from your Matters.
Once connected, you will set up integration preferences for individual court systems (ex/ Federal Courts, Florida State Court, etc). These courts can be selected via the dropdown menu at the top of the app page.
If you work with multiple courts, each one will have to be set up separately.
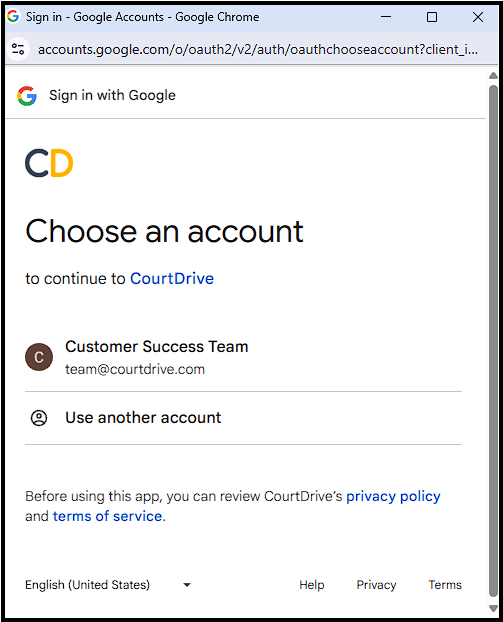
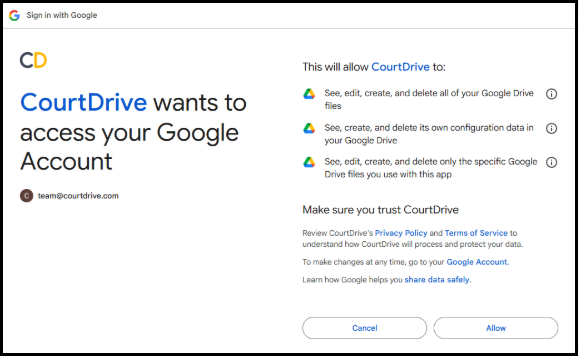
Google Drive Setup
To connect to Google Drive, you will need to authorize the application and account.
Upon selecting the ‘Connect’ button, a new window will appear. Follow the prompts, and connect your specified account.
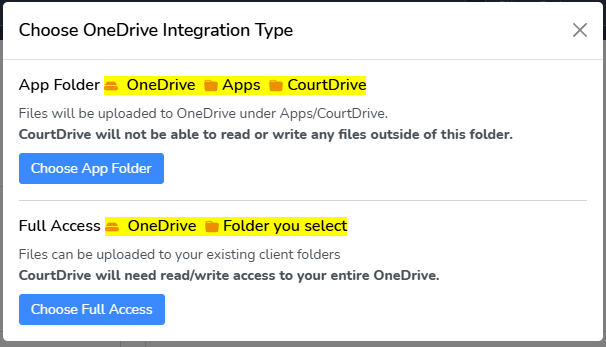
OneDrive
To connect to OneDrive, you must choose an Integration Type. Selecting ‘App Folder’ will create a single CourtDrive folder, in which all client/case folders must be placed.
Full Access will allow us to upload to your existing client/case folders.
Box
When connecting to Box, you will need to authorize access, in order for CourtDrive to upload documents.

MyCase/MyCase Calendar
Connecting MyCase/MyCase Calendar requires you to authorize and log in, so that CourtDrive can map cases and upload documents.
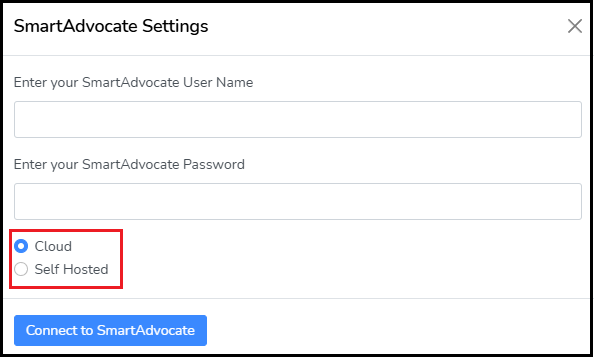
SmartAdvocate
You will need to choose the SmartAdvocate system that you are logging in to, Cloud-based or Self-Hosted, before you will be able to connect.
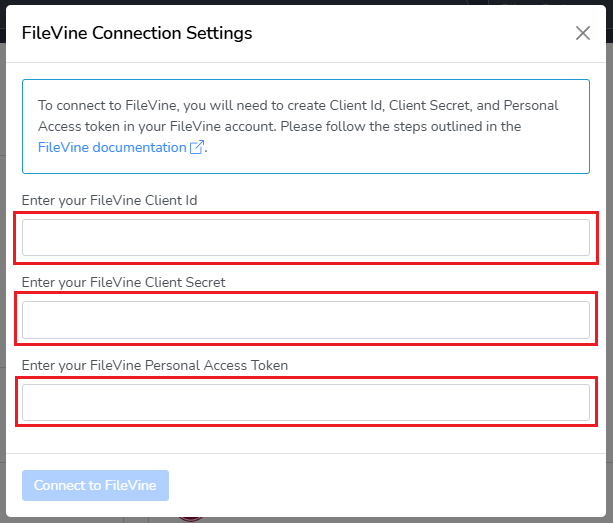
FileVine
Use steps provided in FileVine documentation to get the required connection information.. Your admin(s) may need to contact FileVine support for this information.
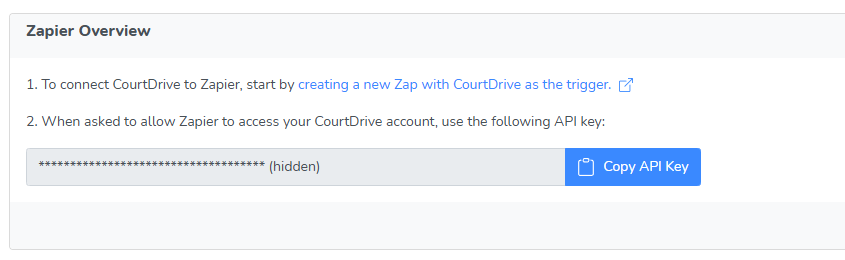
Zapier
When linking an app in Zapier, and creating a Zap for the first time, it will prompt for an API key:
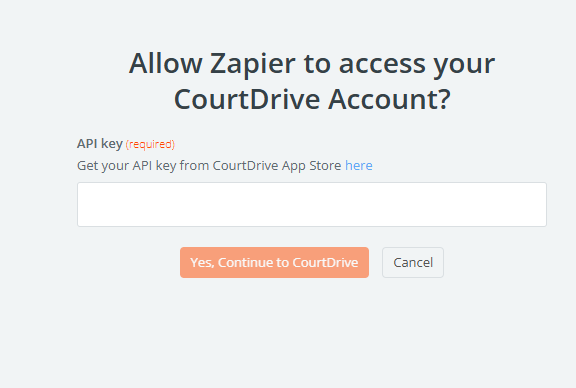
This can be found in your Zapier integration settings, in the App Store.
Outlook Setup
Once Outlook is selected, you will need to allow access:
1.

2.
3.
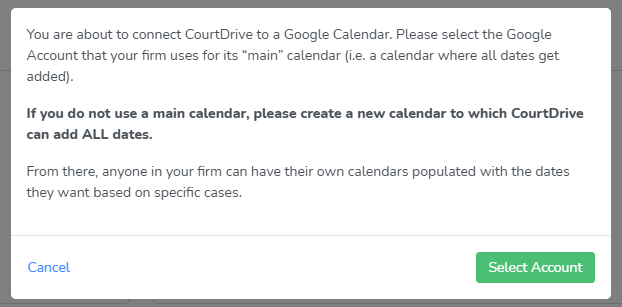
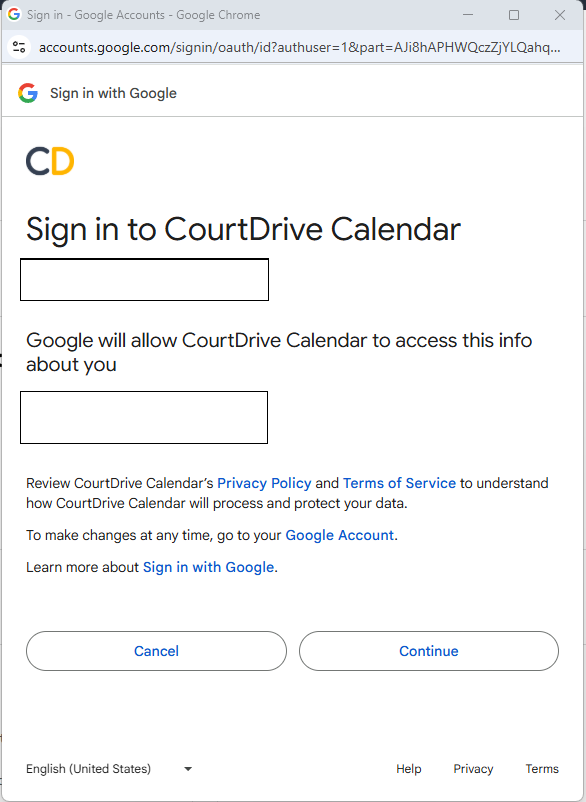
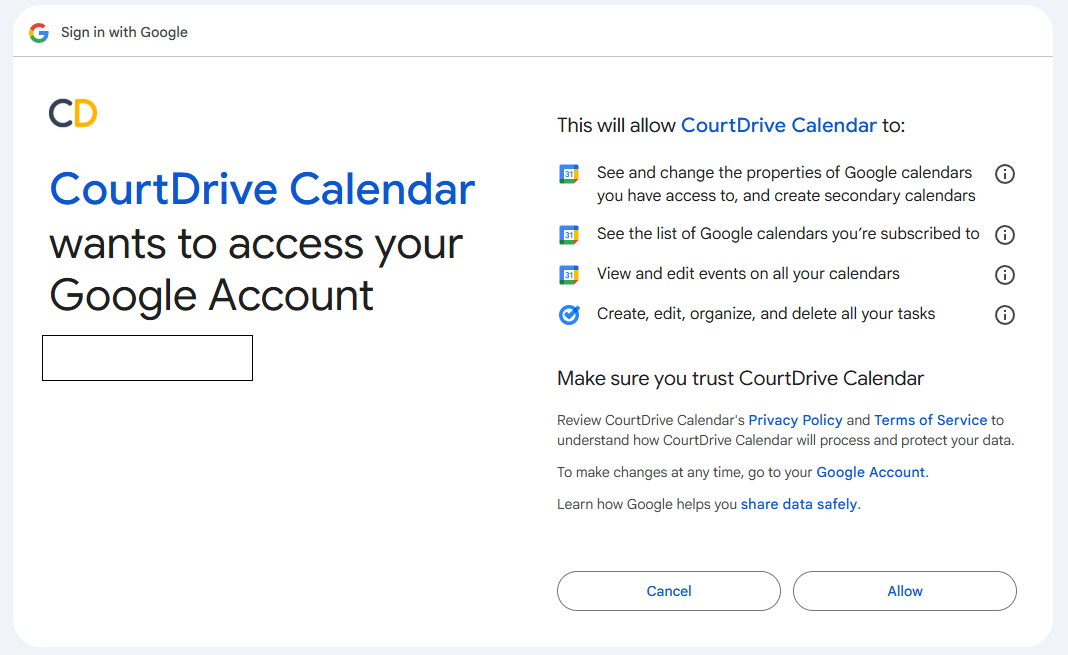
Google Calendar Setup
Once Google Calendar is selected, you will need to allow access:
1.
2.
3.
Workstation Sync Setup
What Does it Do?
The Workstation Sync tool will download PDFs to your desktop (local) computer or a selected network drive.
How do I set it up?
Step 1: Install Sync Utility
From the App store, after selecting the Workstation Sync app:
You will be prompted to download and install the sync utility. Follow the prompts to complete the installation. Once installed on your computer, you will need to configure settings on the CourtDrive website:
Step 2: Configure settings
Once you’ve installed the sync utility, you can access the settings page on CourtDrive.com as shown below:
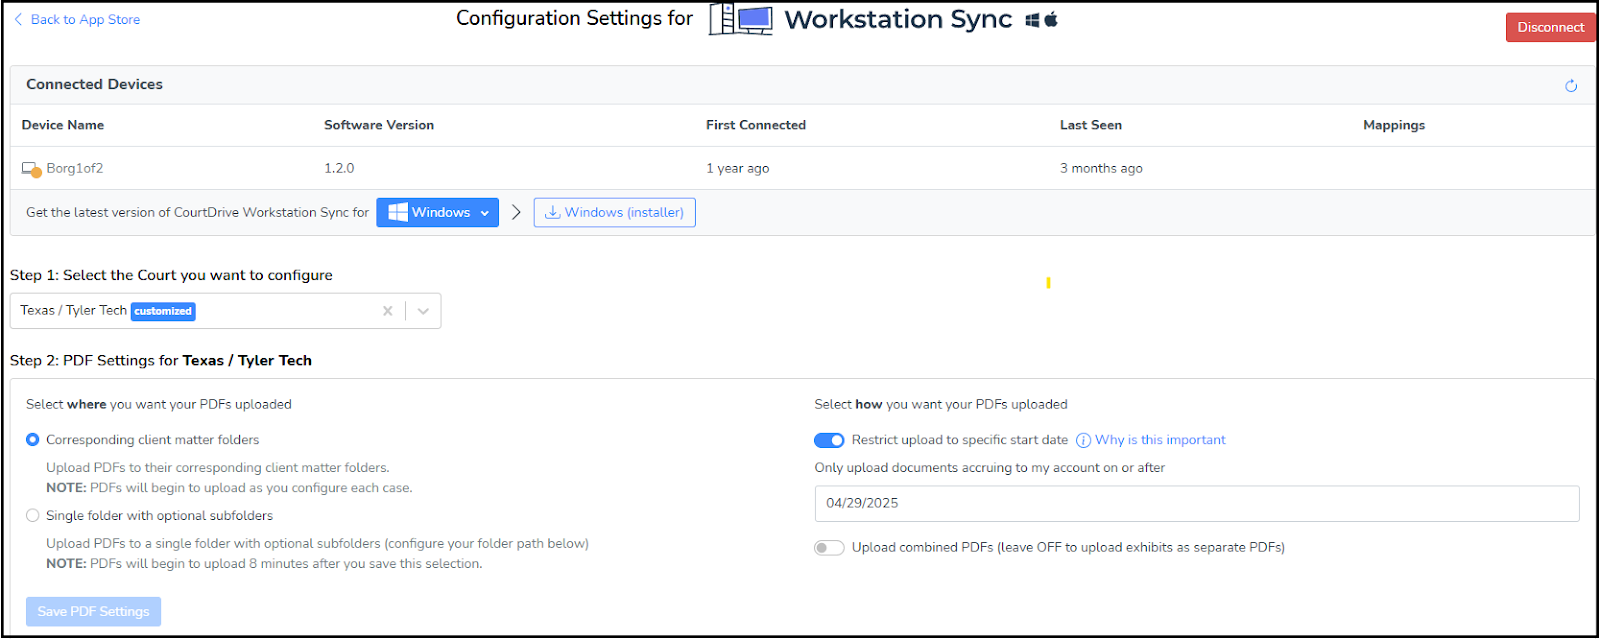
The settings page will show you the device on which you installed the Workstation Sync program. Proceed to customize the settings as desired:
Note: PDF settings are unique per court, ie Federal court, a specific state court, etc., so make sure you first select the court(s) you want to configure. Use the specified dropdown menu to choose each Court (see below):
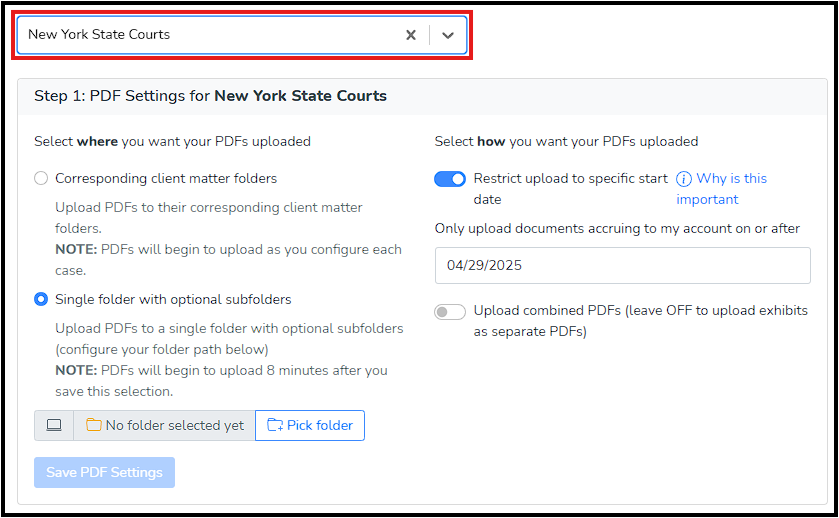
A. You must first select WHERE you want your PDFs uploaded.
- Option 1: Corresponding client matter folders, where you select a specific location for each case from the Matters list
- Option 2: A Single folder with optional subfolders, where you select a single location for all cases. This will cause all PDFs to automatically be sent to this location after configuration is finished.
B. Next, decide HOW you want them uploaded. Note, if you are an existing customer, make sure there is a start date indicated for the downloads in order to prevent duplicates and prevent overage charges by uploading a lot of past PDFs you do not want uploaded.
C. Naming convention: You may edit the naming convention of your PDFs so that CourtDrive will rename it to your liking prior to uploading to your service. You may drag and drop fields to reorder, add or remove them.
Step 3: Mapping Cases to a Specific Location
If you select to have CourtDrive upload PDFs to your existing client folders (Step 2A above), then you must do a one-time mapping for each case you want synced. Using simple select boxes as shown below, you need to link each case on CourtDrive to your desired folder on your computer.
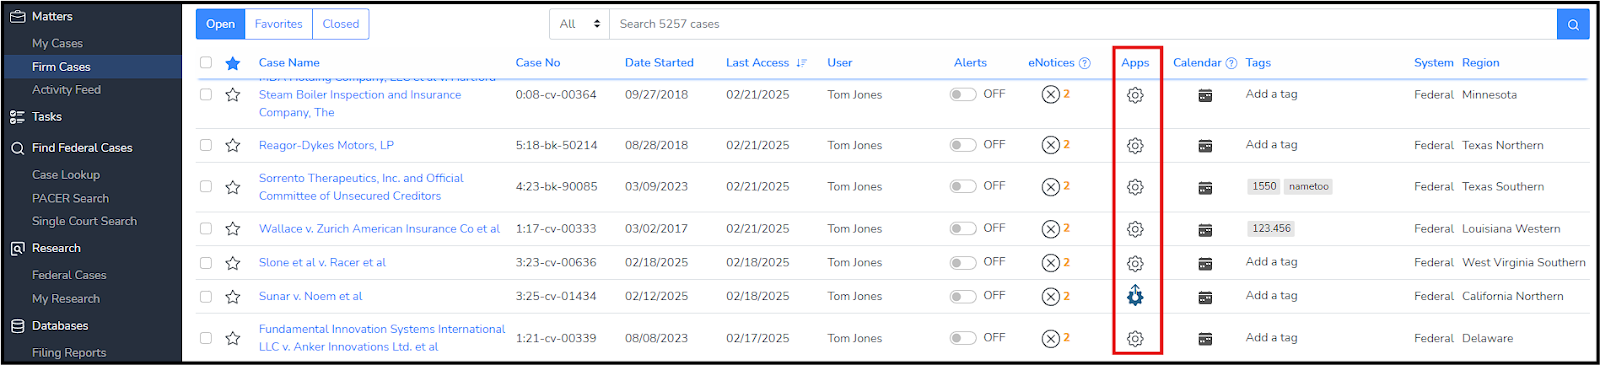
Navigate to the Firm Cases, and for any case you want to map, click on the gear icon under the Apps Column to open the configuration window (NOTE: only Admins have access to the Apps column):
Second, in the configuration window, select the folder you want your PDFs uploaded to and click save and shown below:
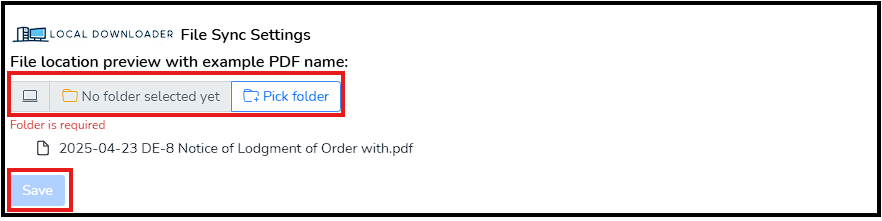
After clicking save, you can close the dialogue. In the future if you want to stop syncing this case, click the ON switch to turn OFF.
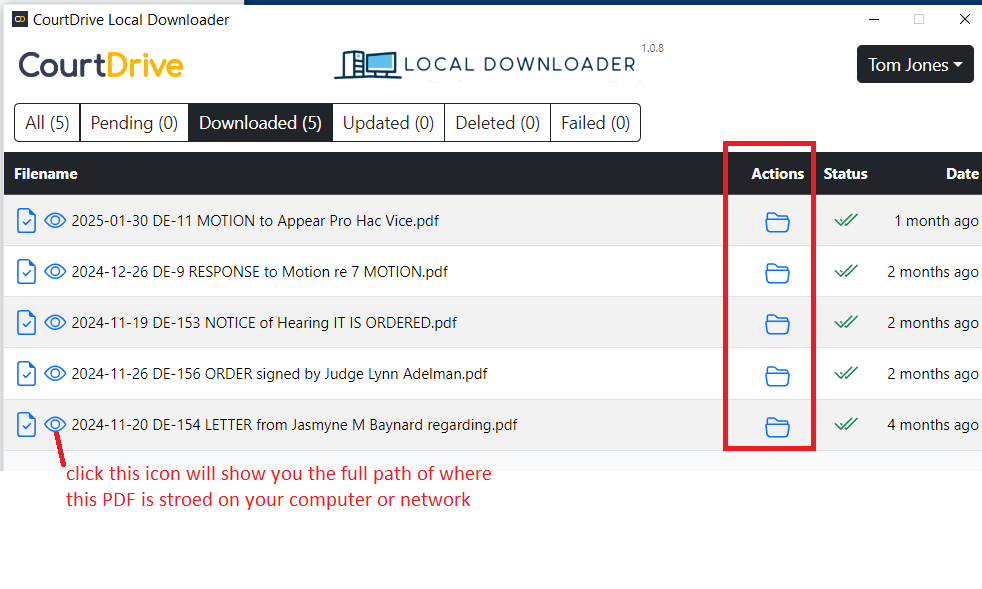
While ON, any documents that come in from eNotices will be automatically renamed and stored on your Local Computer in the location you indicated. You can refer to the CourtDrive sync utility on your computer to see what PDFs were downloaded, pending or failed.
If you click the folder icon under the Actions column, the folder on your computer containing the PDFs will open, and you can access your PDFs from there.